Note: Scheduled Screenshots in the Chrome Extension
For automating scheduled screenshots, we recommend running the Chrome extension in a virtual machine or on a dedicated device.
Introduction
With the PagePixels Screenshots Chrome extension, you can take automated screenshots directly from your browser, capturing pages as they appear on your computer.
Why use the Chrome Extension? When you use your browser to take screenshots, it makes it possible to capture content that requires:
Verification that you are not a bot (e.g. Google reCAPTCHA, CloudFlare turnstile, and other CAPTCHA and CAPTCHA-like mechanisms)
Social login (e.g. signing in with your Google account)
An Authenticated browser session (e.g. session created after verifying via email)
Access from a specific region
And you can capture content that is simply blocked (e.g. Ads that you want to screenshot to confirm their placement)
The PagePixels Screenshots Chrome extension comes with a variety of features to help you automate screenshots from your browser.
✔️
Schedule Screenshots
Take screenshots by time interval, days of the week, and time of day.
✔️
Integrate Screenshots
Send and save screenshots to thousands of other services and apps via Make, Zapier, or the Screenshots API.
✔️
Full Page Screenshots
Take screenshots of an entire web page.
✔️
Single Element Screenshots
Take screenshots of a specific part of a web page by clicking on the element you want to capture.
✔️
Record & Replay Pre-Screenshot Actions
Record actions you take on a website, such as clicks, scrolling, filling out forms, and more. The extension will then automatically replay your action before it takes the screenshot (it's like Multi-Step Screenshots, but you don't have to manually add each step and selector).
✔️
Custom CSS
Insert Custom CSS to change the look of the web page or remove elements and the extension will automatically apply your styles before taking the screenshot.
✔️
Edit Wait Times
View recorded steps and edit wait times to give the web page more time to load.
✔️
Pause Screenshots
Want to temporarily stop screenshots? You can pause and resume your screenshots at any time within the extension.
✔️
Custom Titles
Customize the names of your screenshot configurations for better identification and differentiation.
Have a feature request for the Chrome Extension?
Send a message describing your request and your use case to:
support-tickets@pagepixels.com
The Chrome Extension is still in beta and we'd love to hear your feedback and suggestions.
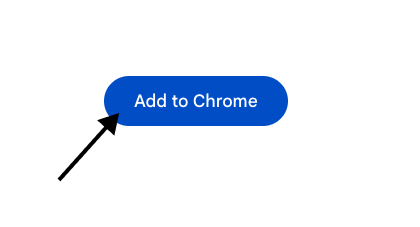
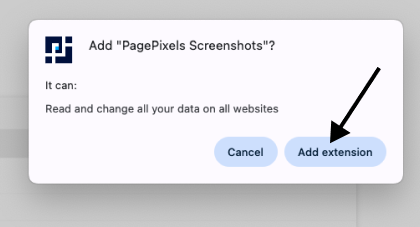
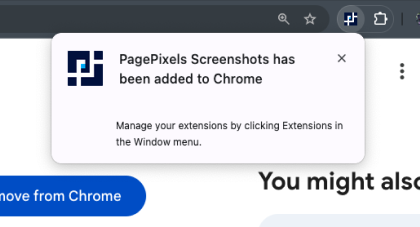
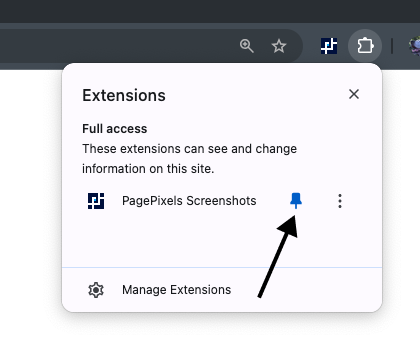
How to set up the PagePixels Screenshots Chrome Extension
Below are the steps for setting up the extension in your Chrome browser:
Once installed, you should see a "PagePixels Screenshot has been added to Chrome" message.
Note: If you have Enhanced Safe Browsing turned on in your browser, you may see a "Proceed with caution" message. To install the extension, click the
Continue to Install
button.
2
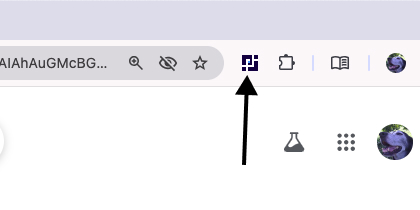
Pin PagePixels to your toolbar (optional)
To easily access the extension, click the puzzle piece icon in the top-right corner of your browser and click the pin icon next to PagePixels Screenshots.
3
Go to the web page you want to screenshot
Note: To use the extension, you'll need to be on a web page that's
not
the default tab for Chrome or a Chrome extension listing page.
4
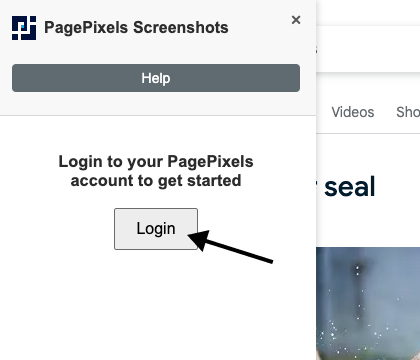
Connect your PagePixels account
Open the extension and click the
Login
button.
To open the extension, click the PagePixels Screenshots extension icon in your browser's toolbar (top-right). If the extension icon is not present, click the puzzle piece icon and select PagePixels Screenshots.
Enter your PagePixels credentials and click
Login
(or connect using your Google account).
Note: Don't have a PagePixels account? Click
Sign up
to create your free account (below the Login button).
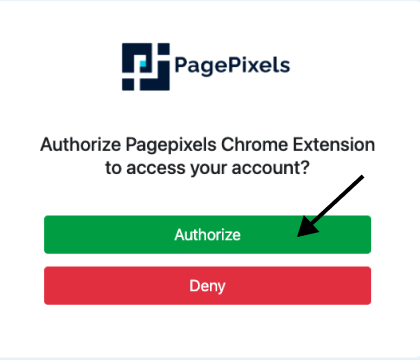
Click
Authorize
to establish a connection.
Once you successfully connect your PagePixels account, you’re ready to start automating your screenshots in Chrome.
How to automate screenshots with the PagePixels Chrome Extension
Below are examples to help demonstrate how you can automate screenshots using the PagePixels Chrome extension.
FULL PAGE SCREENSHOT EXAMPLE
How to automate full page screenshots with the Chrome Extension
Using the PagePixels Chrome Extension, you can automate full page screenshots of web pages.
To demonstrate, we're going to create a screenshot configuration that takes daily full page screenshots of a Google Search results page.
The PagePixels Screenshots Chrome extension installed in your browser
The web page you want to capture in a full page screenshot
The above screencast video uses the PagePixels Chrome Extension to capture a full page screenshot of a Google Search results page and schedules the screenshot automation to run once per day.
1
Open extension
Go to the web page you want to screenshot and click the PagePixels Screenshots icon in your toolbar to open the extension.
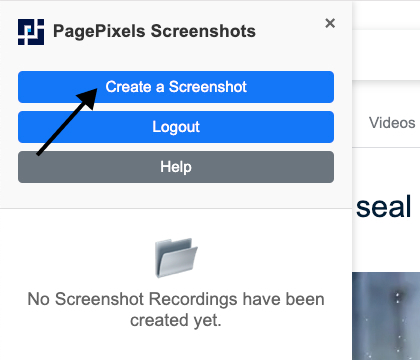
2
Click
Create a Screenshot
3
Scroll the page (optional)
You may want to scroll the entire page to help ensure content fully loads. The extension will automatically replay your scroll before taking the screenshot.
4
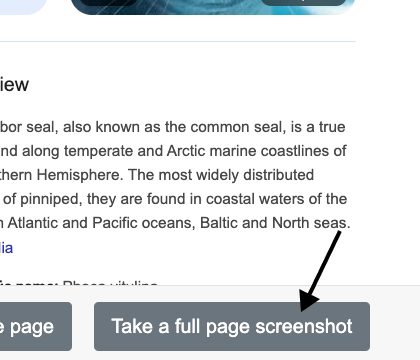
Click
Take a full page screenshot
5
Set your schedule
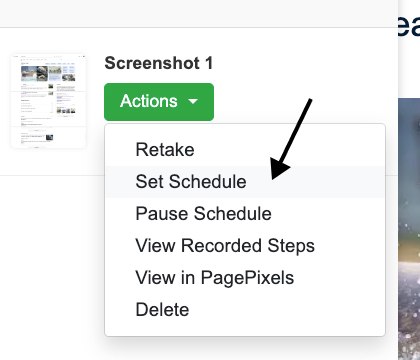
Click
Actions
and select the
Set Schedule
option.
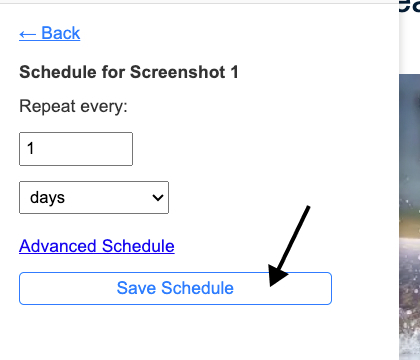
Define your desired schedule and click the
Save Schedule
button.
🎉 Your full page screenshot is now set in the Chrome extension and will automatically run according to your schedule.
SINGLE ELEMENT SCREENSHOT EXAMPLE
How to automate screenshots of part of a web page with the Chrome extension
Want to automate screenshots of only a specific element on a web page? You can accomplish this with the Chrome Extension.
To demonstrate how you can do this, we're going to set up a screenshot that captures only a specific image on a Wikipedia page.
The PagePixels Screenshots Chrome extension installed in your browser.
The web page containing the element you want to screenshot.
1
Open extension
Go to the web page you want to screenshot and click the PagePixels Screenshots icon in your toolbar to open the extension.
2
Click
Create a Screenshot
3
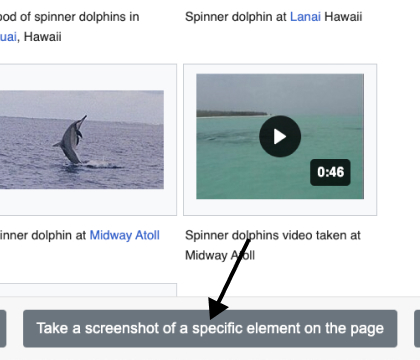
Click
Take a screenshot of a specific element on the page
4
Select the element you want to screenshot
5
Set your schedule
Click
Actions
and select the
Set Schedule
option.
Define your desired schedule and click the
Save Schedule
button.
🎉 The Chrome extension will now automatically take recurring screenshots of that specific element for you.
Integrate Chrome Screenshots
You can send, save, and upload screenshots generated by the Chrome extension to other services using Zapier, Make, and our Screenshot API.
This is because each time the extension takes a screenshot, a copy automatically saves to your PagePixels account, making the screenshot images accessible for integration and automation.
ZAPIER CHROME SCREENSHOTS
How to get Chrome screenshots into your Zapier automations
To use screenshots created by the Chrome extension in Zapier, you can use the
New Screenshot
Trigger or
Find Latest Screenshot
Action in your Zap.
New Screenshot
This Trigger runs when there's a new screenshot in your PagePixels account, including screenshots created through the Chrome extension.
You can limit the trigger to only run when a specific screenshot configuration captures a new screenshot.
Find Latest Screenshot
This Action retrieves the latest screenshot created in your PagePixels account.
You can limit the action to only fetch the latest screenshot for a specific screenshot configuration.
EXAMPLE: Using the New Screenshot Trigger
For this example, we're going to bring screenshots into Zapier using the "New Screenshot" Trigger and limit the trigger to only run when new screenshots are taken by a particular screenshot configuration.
An existing scheduled screenshot configuration in your Chrome extension.
(Optional) The screenshot configuration ID for the Chrome screenshot configuration you want to limit the Zapier trigger to. Here's a quick screencast that shows you one way you can acquire the screenshot configuration ID and use it in Zapier.
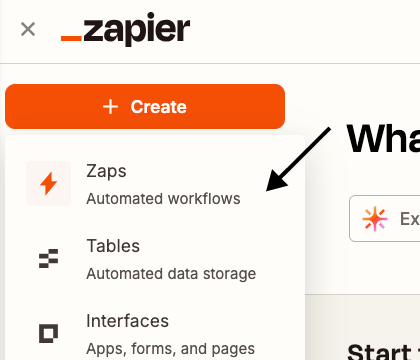
1
Create new Zap
Click the
+ Create
button in your Zapier account and select the
Zaps
option.
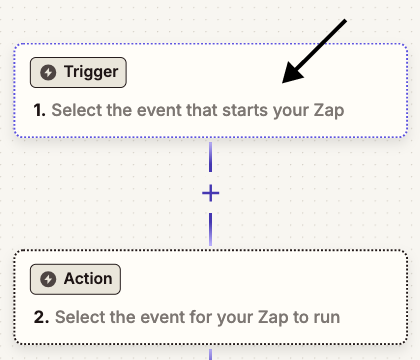
2
Add New Screenshot Trigger
Click
Trigger
Search for and select the
PagePixels Screenshots
app.
Choose
New Screenshot
as the trigger event and click
Continue
3
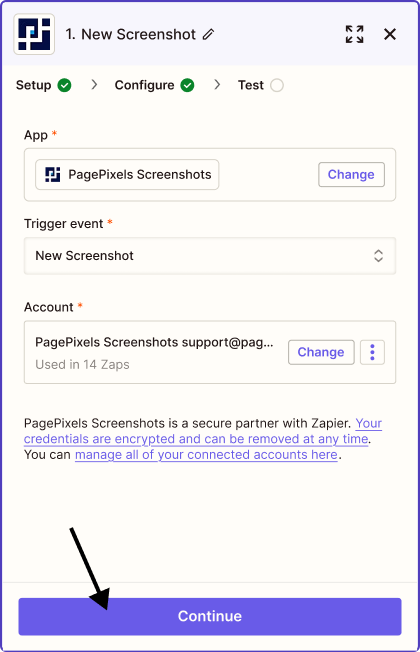
Configure the New Screenshot Trigger
By default, the trigger will run for all screenshots taken in your PagePixels account.
If you'd like to limit the trigger to only run when a specific screenshot configuration captures a new screenshot:
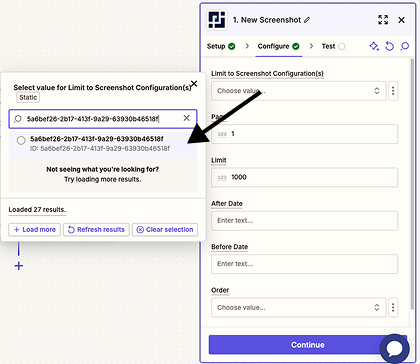
Click
Limit to Screenshot Configuration(s)
field
Copy and paste your screenshot configuration ID into the Search field. See example here.
Select the matching result.
Once you're done, click the
Continue
button.
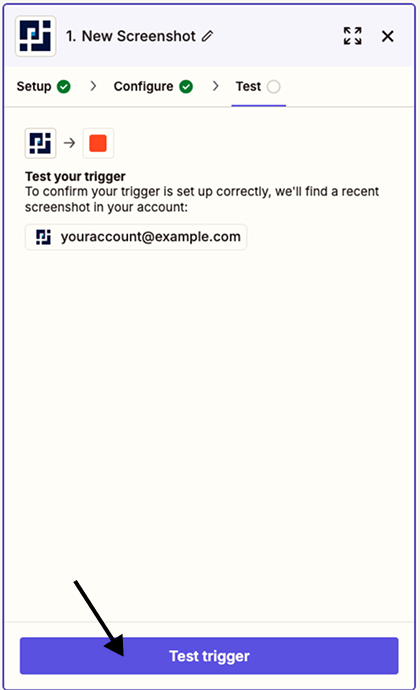
4
Test the New Screenshot Trigger
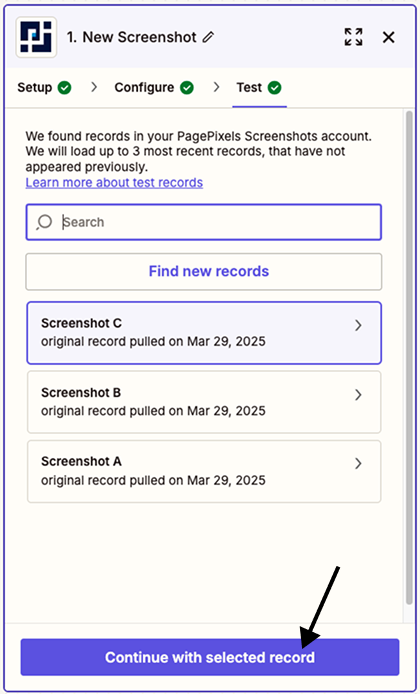
Click
Test trigger
Click
Continue with selected record
Your trigger is now configured, and you can continue building your Zap.
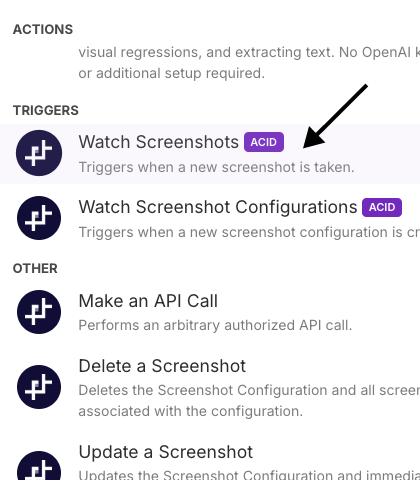
MAKE CHROME SCREENSHOTS
How to get Chrome screenshots into your Make automations
To use screenshots created by the Chrome extension in Make, you can use the
Watch Screenshots
Trigger or the
Make an API Call
Action in your Make Scenario.
Watch Screenshots
Triggers when a new screenshot is taken in PagePixels, optionally limited to specific screenshot configurations.
Make an API Call
Performs an arbitrary authorized API call.
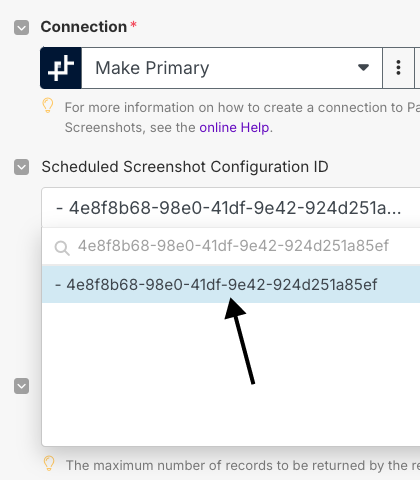
EXAMPLE: Using the Watch Screenshots Trigger
For this example, we're going to pull screenshots into Make using the "Watch Screenshots" Trigger and limit the trigger to only watch for new screenshots taken by a specific screenshot configuration.
An existing scheduled screenshot configuration in your Chrome extension.
(Optional) The screenshot configuration ID for the Chrome screenshot configuration you want to limit the Make trigger to. See this screencast video for an example of how to acquire the screenshot configuration ID and use it in Make.
1
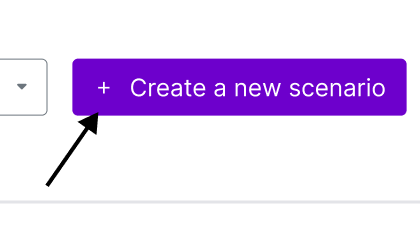
Create new Scenario
Click the
+ Create a new scenario
button in your Make account.
2
Add the PagePixels
Watch Screenshots
Trigger
Search for and click on the PagePixels Screenshots app.
Select "Watch Screenshots"
3
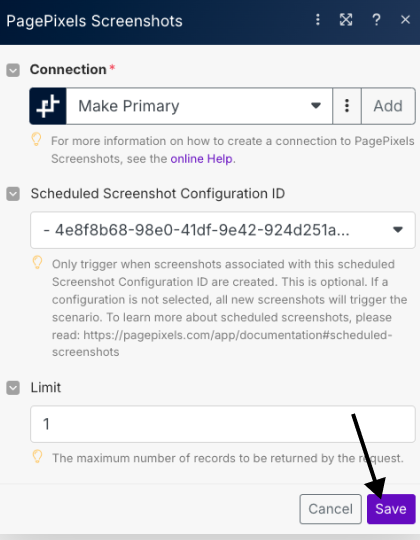
Configure Watch Screenshots Trigger
By default, the trigger will run for all screenshots taken in your PagePixels account.
If you'd like to limit the trigger to only run when a specific screenshot configuration captures a new screenshot:
Click
Scheduled Screenshot Configuration ID
field.
Copy and paste your screenshot configuration ID into the Search field. See an example here.
Select the matching result.
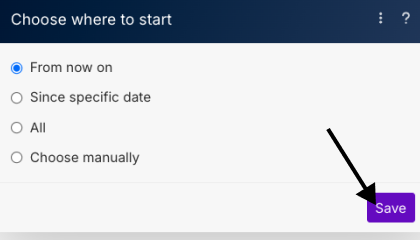
Click the
Save
button
Click
Save
again
Your trigger is now configured, and you can continue building your Make Scenario.
Important Notes
Here are some important notes to keep in mind when using the Chrome Extension:
The scheduler for the extension runs in the background, opening pages behind your active windows and closing them automatically once the screenshot is taken. If you are actively working in another Chrome window, scheduled screenshots may not work as expected.
For optimal results,
we recommend running the extension on a dedicated computer or in a virtual machine.
The extension
does not
open in the default Chrome tab or on a Chrome extension listing page. Want to screenshot a Chrome extension listing? You can accomplish this with the PagePixels web app, Zapier integration, Make integration, or Screenshot API (instead of the Chrome extension).
Because this is our first extension and it's still new, you may see a "This extension is not trusted by Enhanced Safe Browsing" message. You can still install it by clicking the "Continue to Install" button.
This extension is in early beta. If you have any suggestions for improvement or encounter any issues, please let us know. We appreciate any feedback you have for us.