Learn how to automatically take screenshots and extract data in Zapier with the PagePixels Screenshots integration.
Introduction
With the PagePixels Screenshots Zapier app, you can automate the process of taking screenshots and sending the images to any of the 7000+ apps Zapier supports, such as:
Zapier (rhymes with “happier”) is a no-code integration platform for moving data and automating the manual repetitive tasks you do between multiple apps every day.
Workflow automations in Zapier are called
Zaps
and zaps operate on an
"if this, then that"
model of automation. In this model,
if
an event happens in one app
then
Zapier fetches data about that event to complete an action in a different app.
For example,
if
a new screenshot appears in your PagePixels' account,
then
upload that new screenshot to your Google Drive.
Creates a screenshot configuration. The configuration can include a recurring schedule and change notifications. You will receive the Embed URL as a part of the response. The Embed URL will always display the latest screenshot image taken for the configuration, so it can be used on public websites, dashboards, and internal systems without worrying about API keys or any other configuration parameters.
Captures a screenshot from real geolocations around the world. Screenshots are taken through a proxy network within the geographical location you specify. Choose from hundreds of countries and any US State for your geolocation testing needs.
Take a Screenshot of a Web Page and Analyze the Image With AI
Captures a web page screenshot and runs an AI visual analysis based on your prompt. Useful for extracting data, generating summaries, or querying the website’s content. No additional setup is required.
Generates an AI visual analysis of any image guided by your text prompt. Submit up to 5 images and 5 prompts. Useful for comparing multiple images, tracking changes, monitoring visual regressions, and extracting text. No additional setup is required.
Find Latest Screenshot
Finds the latest screenshot on the account or from a given Screenshot Configuration
Find a Screenshot Configuration and Capture Next Screenshot
Finds an existing screenshot configuration in your PagePixels account and captures a new screenshot for it (regardless of its scheduled interval).
Get HTML Code of a Website
Download the raw HTML source code of a website (instead of taking a screenshot)
Initiates a new Domain Research Report request. This action can help automate domain research and structured data extraction from domains and websites. Provide a list of URLs and request up to 100 custom data fields for extraction (e.g. email, company details, product info) guided by your AI prompts.
Check a Domain Research Report Status
Retrieves the status of a Domain Research Report request. Returns progress and completion details.
Find a Domain Research Report
Retrieves a completed Domain Research Report. Returns the name, status, and results for the report.
Find All Domain Research Reports
Retrieves all Domain Research Reports for your account (up to 1000). Optionally limit results by created at date.
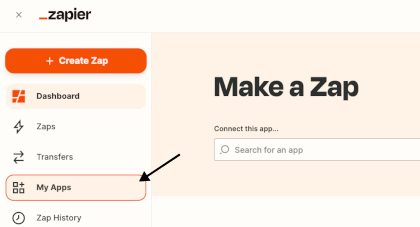
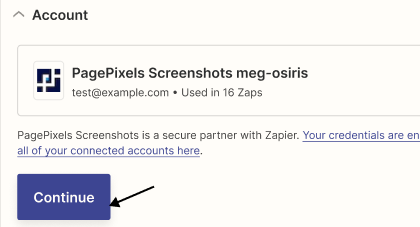
Connect PagePixels to Zapier
You can connect your PagePixels account to Zapier while you're creating a Zap or in the "My Apps" section of your Zapier account, as shown below.
You can also get here by clicking “My Apps” in the left sidebar menu.
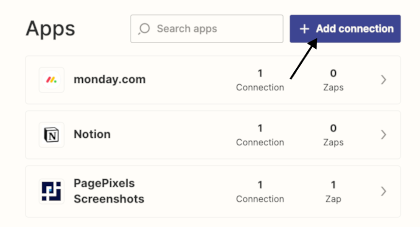
3
Click the “+Add connection” button.
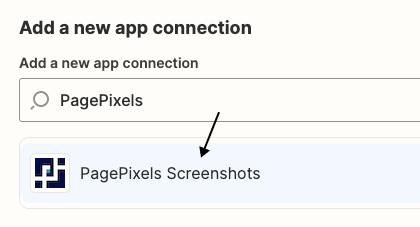
4
Search for and select the PagePixels Screenshots app.
5
Authenticate your PagePixels account.
Once you successfully connect your PagePixels account to Zapier, you’re ready to start automating your screenshots.
How to automate screenshots in Zapier
Below are examples to help demonstrate how you can automate screenshots in Zapier.
TAKE A DAILY SCREENSHOT EXAMPLE
How to take automatic screenshots in Zapier
Using PagePixels "Take a Screenshot of a Web Page" Action, you can automate taking recurring screenshots of web pages within Zapier.
To demonstrate, we're going to create a Zap that takes screenshots of a website and sends the image in a Gmail email message on a daily schedule.
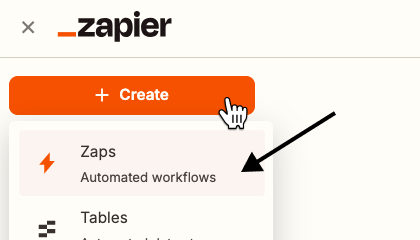
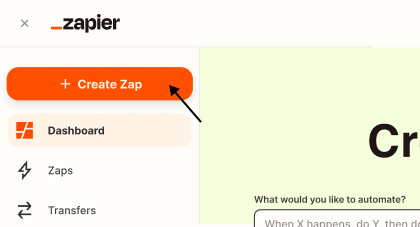
1
Create a new Zap
Click "Create", then select "Zap" from the list of options.
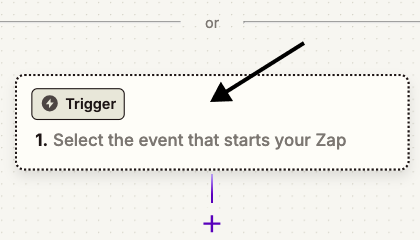
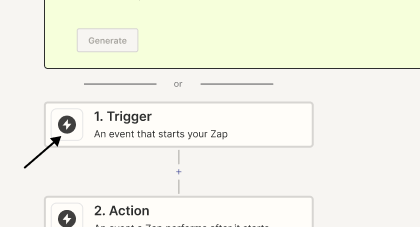
2
Set up your
Schedule
Trigger app event
Click the Trigger button.
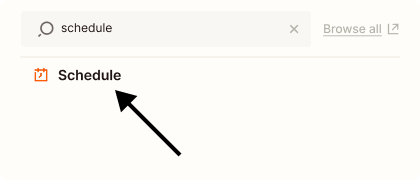
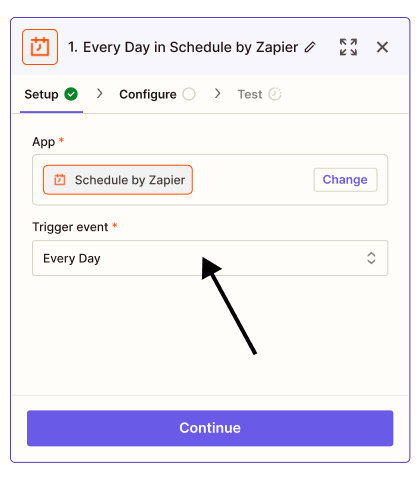
Search for and select Zapier's Schedule app to run your automation on a recurring schedule.
For a daily screenshot, select the
Every Day
app event.
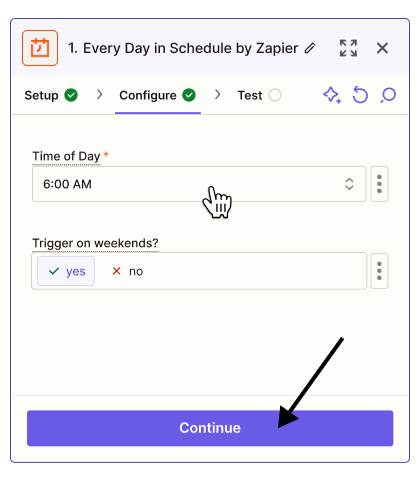
Set your preferred schedule and click the Continue button.
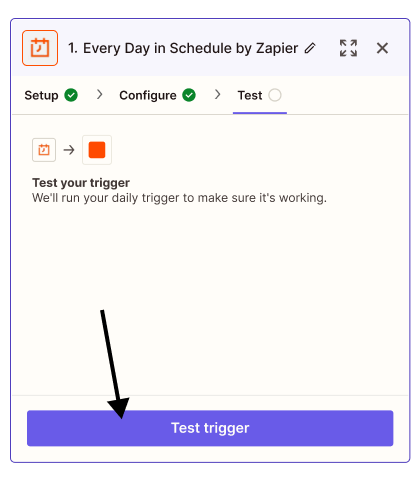
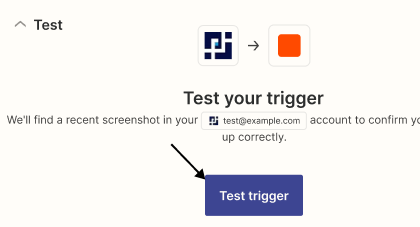
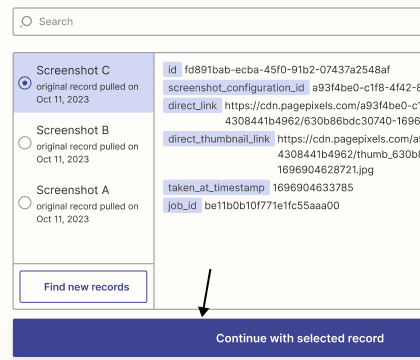
Click Test trigger.
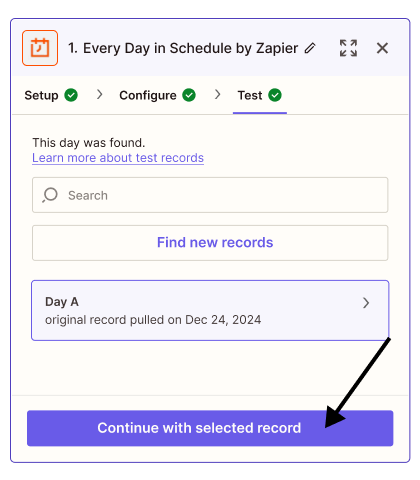
Click Continue with selected record to finish setting up your Trigger app event.
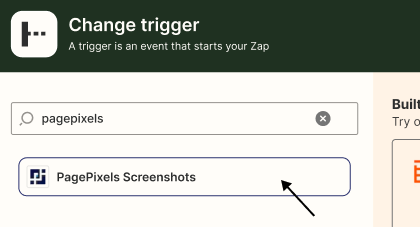
3
Set up PagePixels
Take Screenshot of a Web Page
Action app event
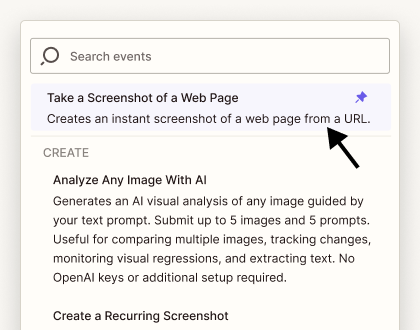
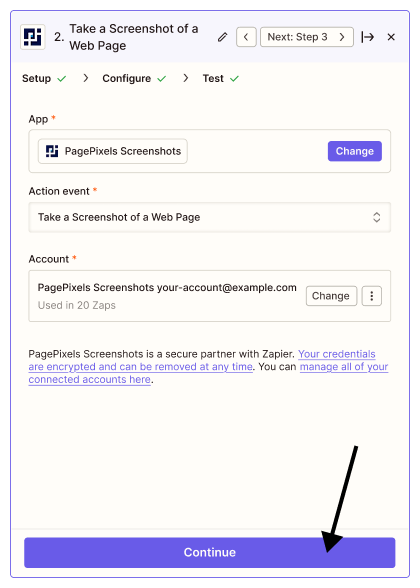
Search for and select the PagePixels Screenshots app.
Select the
Take a Screenshot of a Web Page
Action event.
Connect your PagePixels account and click Continue.
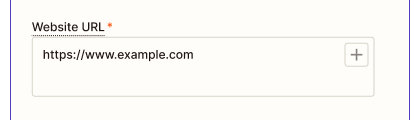
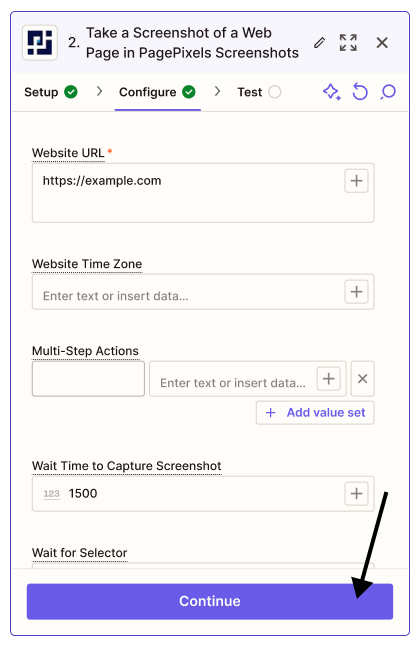
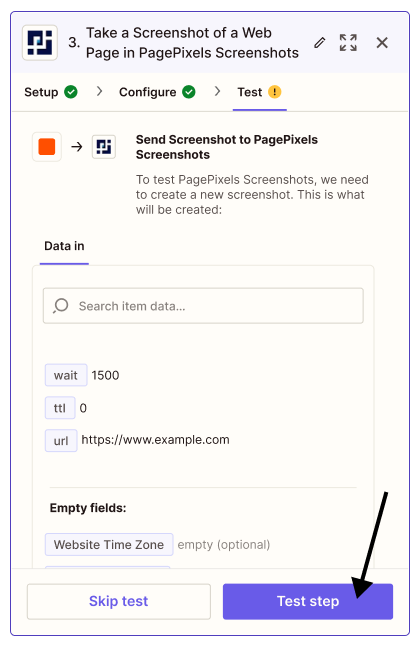
Add the URL for the page you want to capture into the Website URL field.
Finish configuring your screenshot and click Continue.
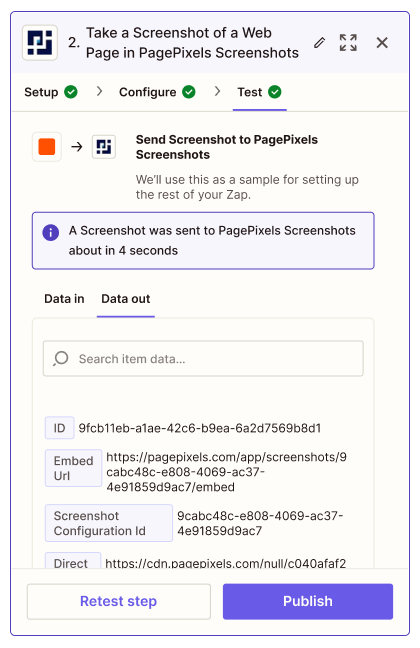
Click the Test Step button.
Preview the test response.
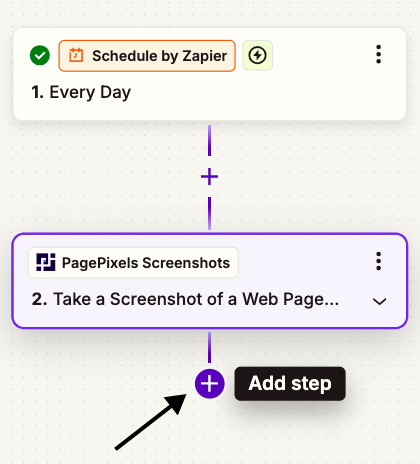
4
(Optional) Send your screenshots to another Zapier app.
Click the plus Add Step button, and select your desired app.
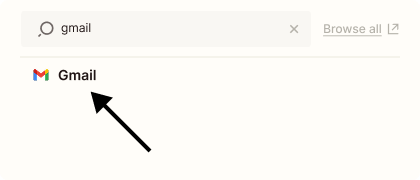
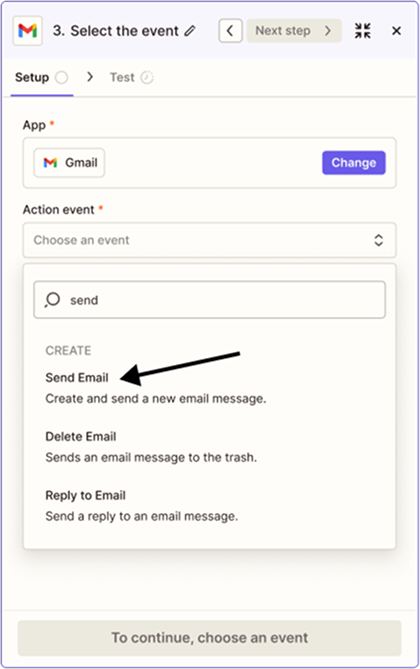
As an example, we'll use the Gmail app to send an email containing the screenshot in the body of the message.
Search for and select the Gmail app.
Search and select the Send Email Action event.
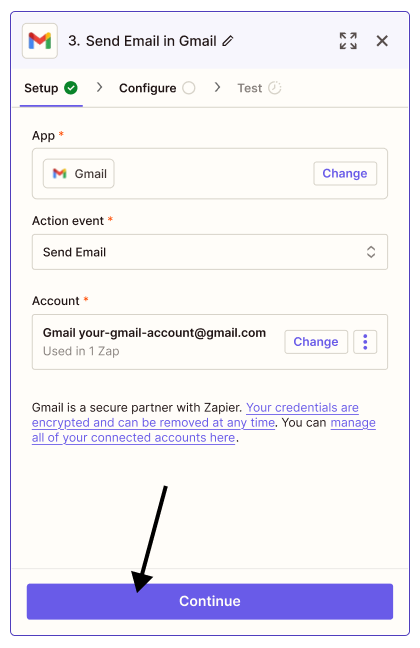
Choose or connect your Gmail account. Click Continue.
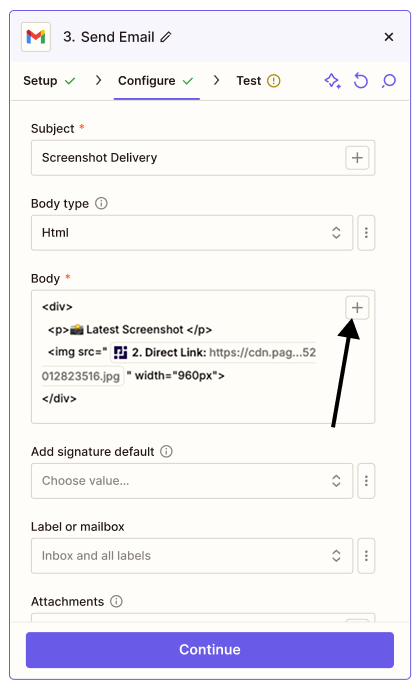
Complete the required input fields. To add the screenshot image to the email:
1. Set the Body type field to
HTML.
2. Add an img tag to the
Body
input field.
3. Use the plus button to add the
Direct Link
data attribute from the PagePixels app as the value of the src in the img tag.
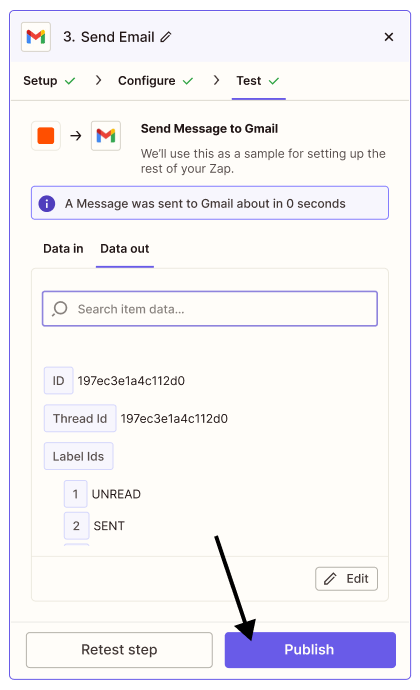
Click Continue.
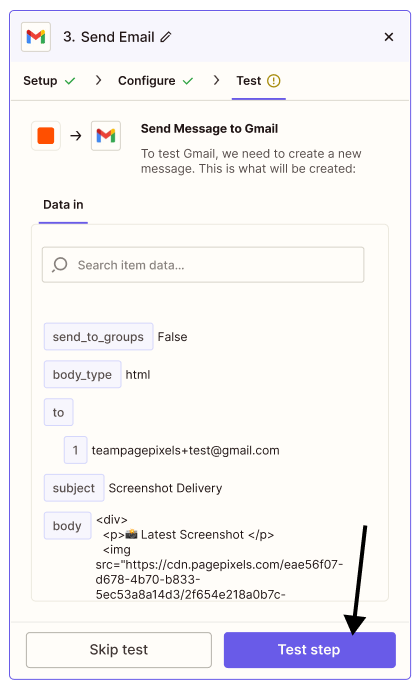
Click Test Step.
Click Publish to activate your Zap automation.
🎉 Your Zapier screenshot automation is now active and will automatically run once per day.
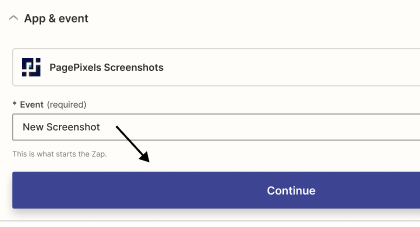
NEW SCREENSHOT TRIGGER EXAMPLE
How to send new PagePixels screenshots to Google Chat in Zapier
The
New Screenshot Trigger
in the PagePixels Zapier app
can watch for new screenshots generated in your PagePixels account and perform an Action on those screenshots.
As an example, let's say you have a recurring screenshot setup in PagePixels, and you'd like new screenshots for that configuration to automatically appear in your Google Chat space.
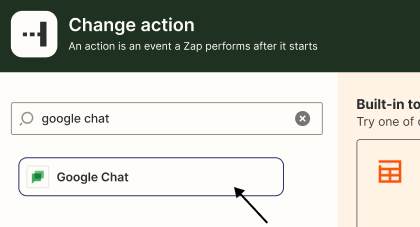
You can accomplish this using the Trigger app event "New Screenshots in PagePixels Screenshots" and the Action app event "Create Message in Google Chat", as detailed below.
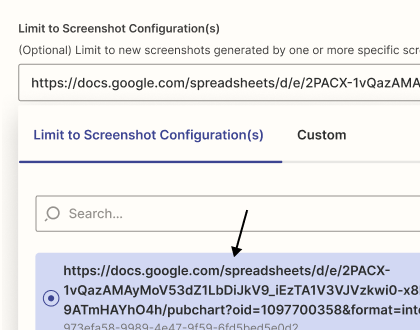
REQUIREMENTS
An existing screenshot configuration in your PagePixels account
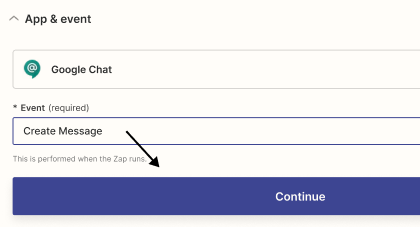
Select "Create Message" from the "Event" dropdown menu, and click the "Continue" button.
10
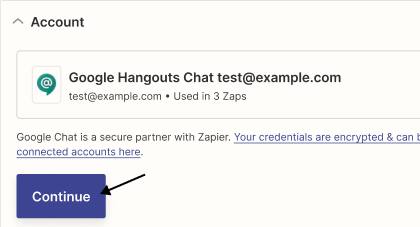
Choose or authenticate your app account.
Select which Google Chat account you'd like to use or authenticate a new account connection.
Then, click the "Continue" button.
11
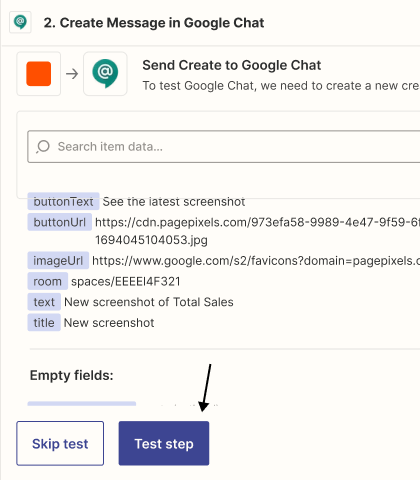
Set up your Create Message action.
To create a Google Chat message, you'll need to complete the required fields (designated by an asterik *):
"Hangouts Chat Room"
"Message Title"
"Message Text"
For this example, we're also going to add input the non-required fields:
"Message Image URL"
"Action Button Text"
"Action Button URL"
The "Action Button URL" field is where we'll insert the new screenshot URL fetched during our Trigger event.
For more details on this step and why we chose to create our Google Chat message this way - see
our notes here.
12
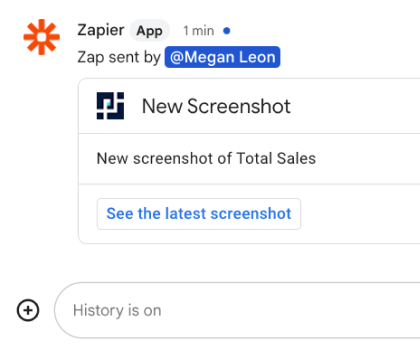
Test action
Click the "Test Action" button
(Note, your test results may look different from the image above, depending on which fields you completed.)
After a successful Action test, you'll find a test message posted to the Google chat room (space) you specified.
13
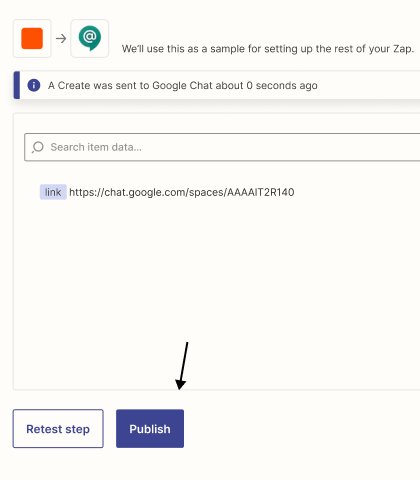
Publish
After a successful Action test, click the "Publish" button.
Then, click "Publish" one more time in the "Ready to publish your Zap" modal window.
🎉 Your Zapier screenshot automation is complete. Now new screenshots for your configuration in PagePixels will automatically send to Google Chat.
📝 Notes
Because of limitations with Zapier's Google Chat app, it's currently not possible to create a Zap that displays the full screenshot image in a Google Chat message. Instead, you can either add a link to the screenshot image or create a button that links to the screenshot. Our example does the latter.
The "Message Image URL" field in the Google Chat action event displays an image at dimensions 24px width X 24px height (not ideal for most screenshot images). In our example, we use this field to display PagePixels' logo (via Google's favicon API), but please feel free to leave this field blank or use your own image.
CUSTOM HTML EXAMPLES
How to create screenshots of your emails in Zapier.
PagePixels'
Take a Screenshot of Custom HTML Action
makes it possible to convert HTML and data from other apps into screenshots, including HTML emails.
Below is a list of Zap templates you can use to take screenshots of your Gmail and Outlook emails using PagePixels in Zapier.
Have questions about the
Take a Screenshot of Custom HTML Action
in Zapier? Please feel free to contact us:
support-tickets@pagepixels.com
Multi-Step Screenshots in Zapier
With PagePixels' Multi-Step Screenshot feature in Zapier, you can automate a set of user actions on a website before taking a screenshot. This means you can:
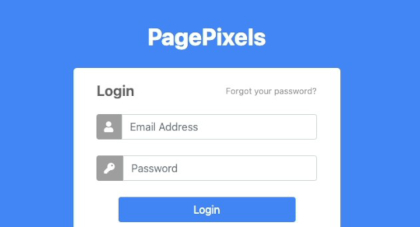
Fill out a password login form,
Perform a search,
Apply filters,
Navigate to another page,
And more.
PagePixels Multi-Step works by making browser actions (click, input text, press enter, etc.) available for you to recreate the steps needed to go from a public web page to the content you want to screenshot.
PagePixels will then automatically run those actions for you prior to taking the screenshot.
You can access Multi-Step Screenshot functionality in Zapier using the
"Multi-Step Actions"
field in a
supported Action
app event.
Multi-Step Actions
Here's a list of available browser actions (aka "Multi-Step Actions"), and the expected format for Zapier.
Make sure to escape special characters (e.g. quotes "", '') in your Multi-Step Action inputs. Otherwise, you may get an invalid_multi_step_actions error or your actions will not work as intended.
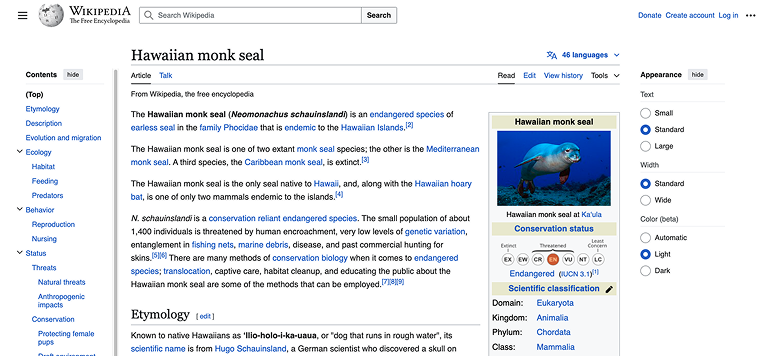
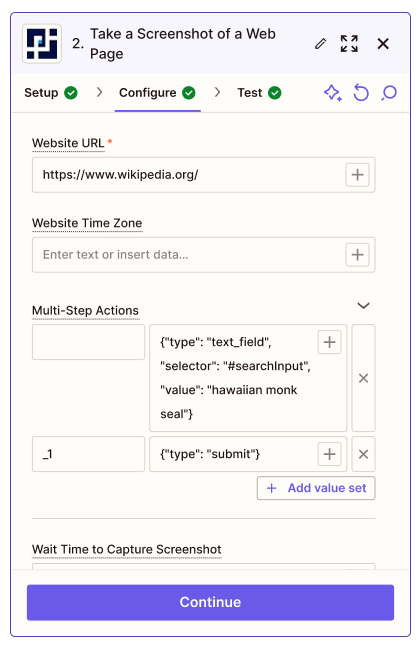
Suppose we want to create an Action in Zapier that does a search in Wikipedia for “hawaiian monk seal” and takes a snapshot of the resulting page.
To create this screenshot, you can use the Action app event "Take a Screenshot in PagePixels Screenshots", and the following inputs in your Action's configuration:
Website URL
https://www.wikipedia.org/
For Multi-Step screenshots, the “Website URL” is the starting point of our step sequence and where the first Multi-Step Action takes place.
The URL must include "https://" or "http://" and be publicly available.
This action will input the text value "tardigrades" into the text field identified by a CSS selector (#searchInput).
{"type": "submit"}
This action simulates pressing the "Enter" key to submit a form. In this case, it submits our search to Wikipedia.
📝 Notes
The left-side column under "Multi-Step Actions" you can leave as is. It will not affect your screenshots or be reflected in your PagePixels account.
To add more Multi-Step Actions in Zapier, use the "+" button. To remove, use the "X" button.
The screenshot generated in this example uses the default settings for "Page Width" (1920px), "Page Height" (1000px), and "Wait Time to Capture Screenshot" (1500ms). You can change these settings in Zapier as needed.
For more examples of creating Multi-Step screenshots in Zapier, check out our Multi-Step Help Guide.
Have questions about how to use Multi-Step Actions in Zapier? Please feel free to send them our way:
support-tickets@pagepixels.com
Domain Research in Zapier
Using the PagePixels' Domain Research actions in Zapier, you can analyze and extract structured data from domains and web pages guided by your custom AI prompts.
Domain Research is helpful for automating your website research and with use cases like:
Data enrichment,
Lead scoring,
Market and investor research,
Business intelligence,
Competitive analysis,
And other business research workflows.
With Domain Research, you can provide just the primary domain (example.com), and our system will crawl the website to find whatever information you need. Or if you want a more focused extraction, you can provide the full URL for the web page.
Once we've processed your domain research request, you can access it in an easy-to-use, clean, structured format for your Zaps. No web scraped mess.
You can try PagePixels Domain Research functionality for free. Free accounts get 25 free monthly credits (1 domain = 1 credit). Paid subscribers get 125 free monthly credits.
To use PagePixels' Domain Research feature effectively in Zapier, you'll want to:
1. Submit a request containing the domains you want to crawl and the information you want to extract using the
Create a Domain Research Report
action.
2. Allow enough time for your domain research request to process with Zapier's Delay for
action.
3. Once your request is complete, you can use
Find a Domain Research Report
action to get your report's findings to use in another app.
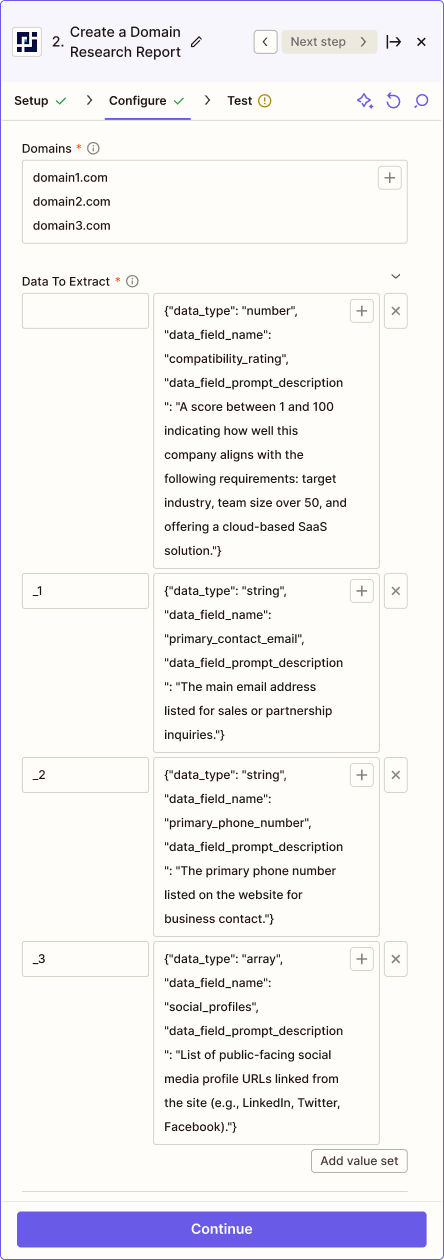
Create a Domain Research Report
The
Create a Domain Research Report
Action in Zapier initiates the request to crawl and extract data from a list of domains or websites you provide.
Note:
This action is asynchronous and puts your request into a queue for processing. Once finished, you can use the
Find a Report a Domain Research Report
action to get the results.
To use this action, you'll need to provide the following information.
Domains (required)
Enter one or more domains or websites. You can use commas or new lines as delimiteres.
Data To Extract (required)
Enter a JSON object that describes the data to extract using data_type, data_field_name, and data_fied_prompt_description keys.
EXAMPLE
{"data_type": "string", "data_field_name": "primary_contact_email", "data_field_prompt_description": "The main email address listed for sales or partnership inquiries."}
BREAKDOWN
Key
Description
Example
data_type
The data type you expect. Value must be a string, number, boolean, or array.
"data_type": "string"
data_field_name
The name for the field. Max 100 characters (no spaces).
"data_field_name": "primary_phone_number"
data_field_prompt_description
An AI prompt describing the data you want to extract. Max 2000 characters.
"data_field_prompt_description": "The main email address listed for sales or partnership inquiries."
Report Title (optional)
Give your report a name for easier reference and differentiation. This information is not used in the analysis.
Additional Notes (optional)
Add extra details about the report for you and your team. This information is not used in the analysis.
Example: How to automate qualifying leads in Zapier
Let's suppose you have a list of company domains and want to identify which ones are high-quality leads for your outreach campaigns and give them a score based on a set criteria.
For example, the criteria could be they need to operate in a specific industry, have a team over 50 people, and offer a cloud-based solution.
In addition, you want to gather useful contact details like email addresses, phone numbers, and social media profiles.
To automate this entire process in Zapier, you can use PagePixels' Domain Research actions. Below is a step-by-step walkthrough to help you set it up.
Note: This example assumes you've already set up a Trigger event.
Step 1: Add the PagePixels' Create a Domain Research Report app action event
Breakdown: Domains
You can add the domains you want to analyze manually (as seen in the image above) or you can use data from another app (e.g. Google Sheets, Microsoft Excel).
Please note, the list of domains must be separated by either commas or new lines.
Breakdown: Data To Extract
{"data_type": "number", "data_field_name": "compatibility_rating", "data_field_prompt_description": "A score between 1 and 100 indicating how well this company aligns with the following requirements: target industry, team size over 50, and offering a cloud-based SaaS solution."}
The AI will analyze the domain based on the provided criteria and determine what number between 1-100 best represents how close it matches the criteria (the higher the number the better the match).
{"data_type": "string", "data_field_name": "primary_contact_email", "data_field_prompt_description": "The main email address listed for sales or partnership inquiries."}
Our system will crawl the domain and extract the email the AI thinks is best for sales or partnership inquiries. Example: email@example.com
{"data_type": "string", "data_field_name": "primary_phone_number", "data_field_prompt_description": "The primary phone number listed on the website for business contact."}
Our system will crawl the domain to find a phone number (if available) for business contact. Note: When the data you want is a phone number, you'll want to use string as the data type (not a number).
{"data_type": "array", "data_field_name": "social_profiles", "data_field_prompt_description": "List of public-facing social media profile URLs linked from the site (e.g., LinkedIn, Twitter, Facebook)."}
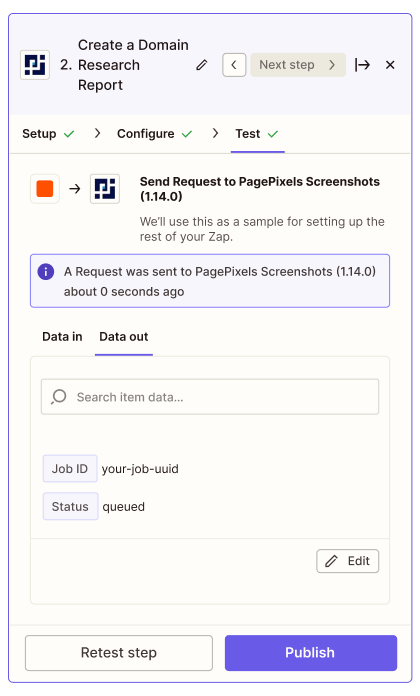
After submitting a successful Create Domain Research Report request, you're output will look something like this:
The
job_id
from the response is what you'll use in the
Find a Domain Research Report
action to retrieve your report.
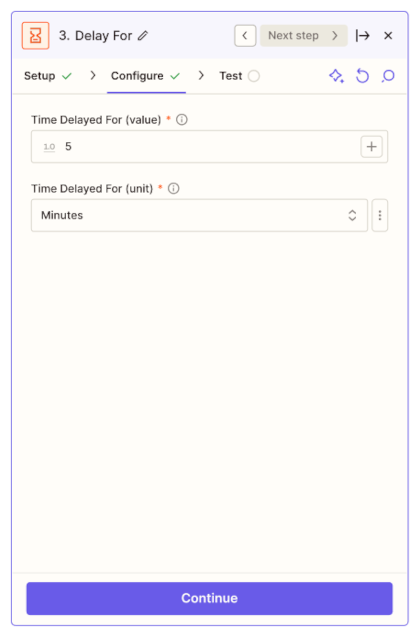
Step 2: Add the Zapier Delay for Action
To allow enough time for our system to create your report, you can use Zapier's
Delay For
action, as seen below.
Note: You can increase the delay time beyond 5 minutes if needed.
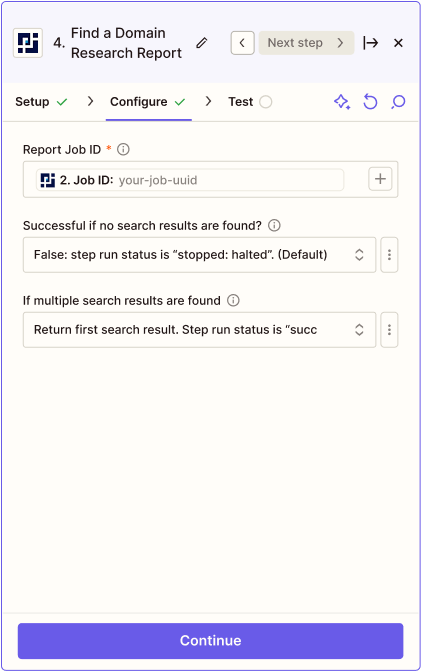
Step 3: Add the Find a Domain Research Report action.
Use the
job_id
from the Create action to find your completed report using the
Find a Domain Research Report
action.
This action will return the data you requested for extraction (Step 1) in a clean format you can use in a subsequent app.
_______________________
Need help using Domain Research actions in Zapier? Contact us:
support-tickets@pagepixels.com
Further Reading
Check out more Zapier and PagePixels tutorials below for automating your workflows.