Guide to taking screenshots with the Screenshot MCP server

Learn how to connect the PagePixels MCP server to AI assistants to capture screenshots, automate browser actions, convert HTML into images, and run domain research using natural language.

Introduction

With the PagePixels Screenshots MCP Server, you can give your AI assistants advanced website screenshot capabilities, such as:

  • Real Locations: Take screenshots from 150+ geographical locations.
  • Custom HTML: Create screenshots from raw HTML and data available from other connectors in your AI client.
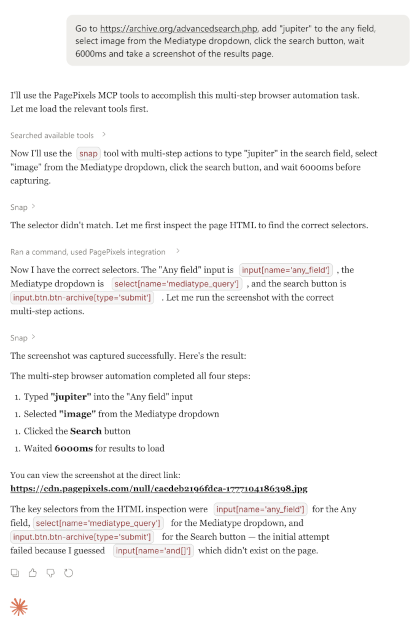
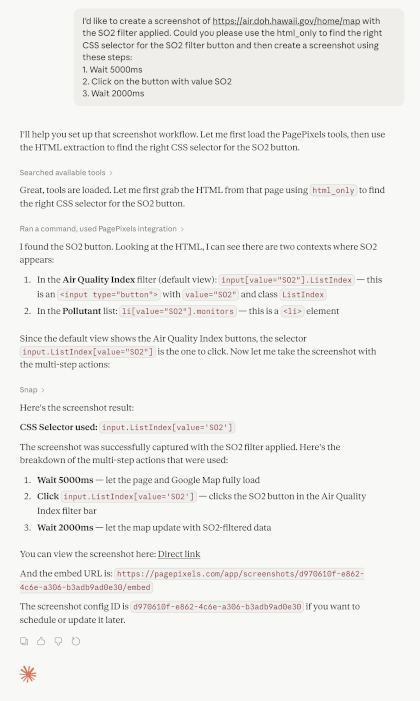
  • Multi-Step Browser Actions: Run a set of pre-screenshot user actions on websites (e.g. filling out and submitting forms, navigating between pages, and applying filters).
  • Highly Configurable Screenshots: Remove cookie banners/ads, inject CSS/Javascript into a page, capture screenshots in different formats, wait for specific selectors, and 20+ more options.
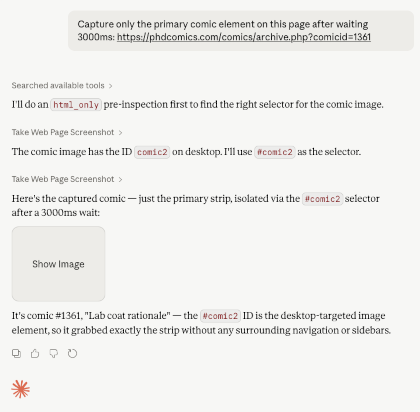
  • Extract HTML: Fetch HTML content from websites that dynamically generate their HTML using JavaScript. This can be especially useful to find CSS Selectors for capturing a specific element on a page or helping the AI use Multi-Step Actions.

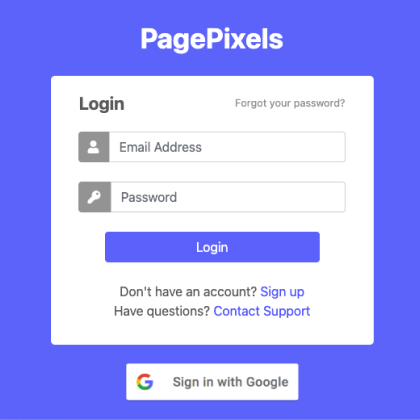
You can get started with PagePixels for free, and the MCP server is available to all plans.

Note: PagePixels MCP Server code is open source and viewable on Github.

MCP Server URL

The PagePixels' Screenshot MCP server is hosted at:

MCP URL
https://mcp.pagepixels.com/mcp

Authentication

Authentication is handled automatically through MCP OAuth 2.1 flow with PKCE. When connecting through an OAuth-capable MCP client, you will be prompted to authorize through a browser window when first connecting.

No manual API key setup is required for MCP connections. The OAuth flow securely links your PagePixels account to the AI client.

Note: PagePixels MCP uses DCR (Dynamic Client Registration) protocol, so there's no need to manually procure a client id and secret from us for the OAuth flow.

For programmatic access outside of MCP (e.g. direct REST API calls), see the PagePixels Screenshot API documentation.

What is MCP?

The Model Context Protocol (MCP) is an open standard that lets AI assistants connect to external tools and services.

With MCP, you don't have to write integration code for a specific AI client, and you can use natural language to perform tasks (e.g. "Take a screenshot of example.com at 720px width in WebP format").

Your AI client will figure out which tools to call and how to formulate the requests for you based on your prompt.

Some examples of AI clients that support MCP and can connect to the PagePixels MCP server:

You can find more MCP-compatible AI clients on the Model Context Protocol website.

Note: For PagePixels MCP server, you'll want to use an AI client that supports DCR (Dynamic Client Registration) protocol.

Available Tools

Below is a list of tools you can use with the PagePixels Screenshots MCP server, grouped by category.

Capture Instant Screenshots

snap — Take Web Page Screenshot

Captures an instant screenshot of any URL with full control over viewport, format, quality, wait conditions, JS/CSS injection, multi-step browser actions, and real locations.

snap_html — Take Custom HTML Screenshot

Renders raw HTML content into a screenshot image. Useful for creating screenshots of HTML emails and custom reports.

capture_screenshot — Capture Next Screenshot

Triggers an immediate screenshot capture for an existing screenshot configuration by ID. Returns the new screenshot once the capture is complete.

Scheduled Screenshots

create_screenshot_config — Create Screenshot Configuration

Creates a new screenshot configuration with optional scheduling. Supports scheduled screenshot intervals ranging from minutes to years. Returns the configuration ID and Embed URL.

get_screenshot_config — Get Screenshot Configuration

Retrieves a screenshot configuration by ID, including all associated settings, the Embed URL, and the latest screenshot details.

update_screenshot_config — Update Screenshot Configuration

Updates any property of an existing screenshot configuration, such as the schedule, format, or capture options. URL is required.

delete_screenshot_config — Delete Screenshot Configuration

Deletes a screenshot configuration and all of its captured screenshots permanently.

list_screenshot_configs — List All Screenshot Configurations

Lists all screenshot configurations in the account with support for pagination and time-based filters.

get_job_status — Check Screenshot Job Status

Checks whether a screenshot capture job has completed and returns the result when ready.

Screenshot History

list_config_screenshots — List Screenshots From Screenshot Configuration

List all screenshots associated with a specific screenshot configuration.

list_all_screenshots — List All Screenshots

List all screenshots across the entire account.

Real Locations

list_real_locations — List All Real Locations

Returns the full list of 150+ real geographic locations available for geo-located screenshot captures, including countries, US states, and major cities.

Change Notifications

list_config_change_notifications — List Change Notifications From Screenshot Configuration

Lists all change notifications for a specific screenshot configuration. Useful for reviewing when and how a monitored page has changed.

list_all_change_notifications — List All Change Notifications

Lists all change notifications across the entire account.

Multiple Image AI Analysis

analyze_any_image_with_ai — Analyze Images With AI

Submit up to 5 images and 5 prompts for an AI to analyze. Images must be a direct link to a PNG, JPEG, WebP, or GIF file that's no bigger than 8MB or 8000px width X 8000px height.

Note: Uses built-in Anthropic Claude models for the analysis.

Website Domain Research

create_domain_research — Create Website Domain Research Report

Submits an AI-powered data extraction job across one or more domains. Define up to 100 custom fields (e.g. pricing, founding year, team size, contact email) guided by your own prompts.

Note: Uses built-in Anthropic Claude models for the analysis.

get_domain_research_status — Check Website Domain Research Report Status

Checks the completion status of a domain research job by ID.

get_domain_research_report — Get Website Domain Research Report

Downloads completed domain research results as JSON or CSV once a job has finished.

list_domain_research_reports — List All Website Domain Research Reports

Lists all domain research reports in the account.

Account

get_account_limits — Get Account Limits

Returns current usage information and plan limits for the authenticated account.

Quick Start

Before connecting, make sure you have a PagePixels account.

For clients that support remote MCP servers over Streamable HTTP, you can point your client at:

https://mcp.pagepixels.com/mcp

Note: Authentication uses OAuth via DCR. No manual entry of an API key or client credentials is required.

Connecting with Claude.ai

Below are the steps to connect PagePixels Screenshots MCP server to the Claude.ai web app:

1

Log in to your Claude.ai account

2

Select Customize (toolbox icon) from the left side-bar.

3

Select the Connectors option

4

Add connector

Click the plus icon and select the Add custom connector option.

5

Configure MCP server

Name your connector and add the PagePixels MCP Server URL to the field.

For example: https://mcp.pagepixels.com/mcp

Click the Add button.

6

Authenticate your PagePixels account

Log in to PagePixels (or click "Sign up" to create a free account).

PagePixels login screen with an arrow pointing at the sign up button
7

Authorize the connection

Click the Authorize button.

PagePixels: Authorize Claude to access your account. Authorize and Deny buttons with arrow pointing at the authorize button

Once connected, PagePixels will be available in all new Claude.ai conversations. You can see a full list of tools and permissions for PagePixels in your Connectors list.

List of tools and permissions for PagePixels inside the Claude web app

Connecting with Goose

Below are the steps to connect PagePixels MCP server to Goose, an open source AI agent:

1

Go to Extensions

Click the Extensions button in the left sidebar.

2

Add custom extension

Click the + Add custom extension button.

3

Configure extension

Give your extension a name.

Change Type to the Streamable HTTP option.

Add PagePixels MCP Server URL to Endpoint field:

https://mcp.pagepixels.com/mcp

Click the Add Extension button.

4

Authenticate your PagePixels account

In the browser window Goose opens, log in to PagePixels (or click "Sign up" to create a free account).

5

Authorize the connection

Click the Authorize button.

Once done, PagePixels will be available in Goose and you'll see it listed in your extensions.

Goose app extension list with PagePixels highlighed

Connecting with Visual Studio Code

Below are the steps to connect PagePixels MCP server to VS Code, an open source code editor:

1

Go to chat settings

Open a chat and click the gear icon.

2

Add custom MCP Server

Select MCP Servers from the sidebar. Click the + button.

3

Configure the MCP server

Select the HTTP option.

Add PagePixels MCP Server URL. Press Enter to confirm.

https://mcp.pagepixels.com/mcp

Give the server a name. Press Enter again.

Choose a scope option. Press Enter one more time.

4

Authenticate your PagePixels account

Click the Allow button.

Click Open and log in to PagePixels (or click "Sign up" to create a free account).

Once you've successfully authenticated your account, PagePixels will be available to your AI chats and added to your VS Code editor's mcp.json file.

Goose app extension list with PagePixels highlighed

Usage Examples

With the PagePixels MCP server, you can have your AI assistants create screenshots using natural language and the AI will automatically call the right PagePixels tool.

To help demonstrate different usage examples, we'll show what the results look like in the Claude.ai web app.

Note: The exact wording in your response can vary between chats, different AI clients, and models used.

Take a screenshot with a set width and image format

"Please take a screenshot of https://en.wikipedia.org/wiki/Tail_wagging_by_dogs in webp format at 780px wide after waiting 2500ms."

See the Claude chat

__

Capture screenshots of geo-targeted website content

"Please take a screenshot of zalando.com from Portugal after waiting 5000ms"

See the Claude chat

__

Emulate mobile screenshots for different devices

"Go to https://www.marinemammalcenter.org/science-conservation/conservation/hawaiian-monk-seal-conservation, wait 3000ms, and take a screenshot emulating an iPhone 14 device."

See the Claude chat

__

Create screenshots from HTML and data that's available to your AI client

"Pull all records from the 'Marketing Campaign Tracking' table in Airtable and create a HTML page that presents all the record information visualized as a table in a light theme. Take a full page screenshot of the HTML page and return the direct image link."

See the Claude chat

__

Schedule screenshots

"Hello Claude, please use PagePixels to create a full page screenshot of https://www.courtlistener.com/ after waiting 4000ms and schedule it for every 12 hours. Please return the embed URL when it's ready."

See the Claude chat

__

Take a screenshot of a specific element

"Capture only the primary comic element on this page after waiting 3000ms: https://phdcomics.com/comics/archive.php?comicid=1361"

See the Claude chat

Note: The "Take a screenshot of a specific element" example consumes 2 screenshot credits. 1 credit for html_only (extracted html from the page to find the correct CSS Selector) and 1 credit for generating the screenshot.

Multi-Step Actions

The snap tool supports a multi_step_actions parameter that lets you automate browser interactions before the screenshot is captured. This is useful for logging in, navigating to specific states, dismissing modals, or interacting with dynamic pages.

Supported Action Types

  • click — Clicks a DOM element identified by a CSS selector
  • hover — Hovers over an element
  • text_field — Types text into an input or textarea field
  • select — Selects a specific field in a dropdown menu
  • checkbox — Checks or unchecks a checkbox field element
  • submit — Emulates pressing the Enter key to submit a form
  • change — Triggers a change event on an element
  • redirect — Navigates the browser to a new URL
  • javascript — Adds a script tag containing your custom JavaScript to the page and runs it.
  • evaluateJs — Executes your custom JavaScript directly without adding a script tag
  • css — Injects custom CSS styles
  • wait — Waits a set number of milliseconds
  • wait_for_selector — Waits until a CSS selector appears in the DOM

Multi-Step Example Prompts

Perform a search with Multi-Step

"Go to https://archive.org/advancedsearch.php, add "jupiter" to the any field, select image from the Mediatype dropdown, click the search button, wait 6000ms and take a screenshot of the results page."

See the Claude chat

__

Apply a filter using Multi-Step

"I'd like to create a screenshot of https://air.doh.hawaii.gov/home/map with the SO2 filter applied. Could you please use the html_only to find the right CSS selector for the SO2 filter button and then create a screenshot using these steps:

1. Wait 5000ms

2. Click on the button with value SO2

3. Wait 2000ms"

See the Claude chat

Note: The "Apply a filter using Multi-Step" example consumes 2 screenshot credits. 1 credit for html_only (extracted html from the page to find the correct CSS Selector) and 1 credit for generating the screenshot.

Multi-Step Resources

Screenshot Capture Options

The snap and snap_html tools support extensive configuration options:

  • Viewport: page_width , page_height , scale_factor
  • Output: image_format (jpeg, png, webp, pdf), quality (1–100 for JPEG), thumbnails
  • Full page: fullpage , fullpage_advanced , incremental_scroll
  • Timing: wait (ms delay before capture), wait_for (CSS selector to appear)
  • Element capture: selectors to capture a specific DOM element
  • Custom Styles: css_inject
  • Scripting: js_inject
  • Remove/disable: no_ads , no_cookie_banners , no_tracking , disable_js , disable_third_party_js
  • Geo-location: real_location (150+ locations) , time_zone , accept_language
  • Auth & headers: cookies , headers , user_agent
  • Caching: ttl to control cache duration (0 for always fresh)
  • HTML extraction: html_only (snap tool) to return fully rendered HTML instead of an image
  • AI Analysis: analyze_image_with_ai (set to true to analyze), ai_prompt (provide custom text prompt). Note: Uses built-in Anthropic Claude models for the analysis.

For a full list of available capture options, see PagePixels' Screenshot API documentation.

Troubleshooting/FAQs

The OAuth authorization window doesn't seem to be opening / the connection fails.

The PagePixels MCP server uses the standard MCP OAuth 2.1 flow with PKCE and Dynamic Client Registration(DCR) protocol. If the authorization window doesn't open or the flow fails to complete, try the following:

  • Confirm the MCP server URL is set to https://mcp.pagepixels.com/mcp (note the /mcp path).
  • Make sure pop-ups and third-party cookies are not blocked in your browser for pagepixels.com and your MCP client's domain.
  • Disconnect the connector in your MCP client, fully close and reopen the client, then add the connector again to trigger a fresh authorization.
  • Check if your AI client supports OAuth connections via DCR. If it only supports API keys or requires OAuth to have a static client ID and secret (not dynamically generated), PagePixels MCP Server will not be able to connect.
I'm connected, but the PagePixels tools aren't being called.

If the connector is listed but the AI assistant isn't using the tools, it usually means the tools aren't enabled or the assistant doesn't think it needs them. Try the following:

  • In your MCP client's connector or tool settings, confirm permissions are set to allow PagePixels tools to be used.
  • Restart the MCP client. Some clients only refresh the available tool list on a fresh session.
  • Be explicit in your prompt. For example, ask the assistant to "use PagePixels to take a screenshot of…" or "use the PagePixels MCP server to…". This nudges the assistant to invoke the tools.
The AI says my screenshot was unsuccessful because my quota has been hit / I'm getting a usage limit exceeded error.

Each PagePixels plan includes a monthly screenshot, AI analysis, and Real Location allowance. If you exceed the limit, the MCP server will return a usage limit exceeded error.

To resolve, you can:

  • Upgrade your plan for your PagePixels account.
  • Or wait until your account usage resets. All PagePixels accounts reset on the 1st at 12AM (UTC time). This is true for both free and paid plans, no matter the subscription start date.

Note: You can use the Get Account Limits tool to check your current PagePixels account limits and usage information.

Multi-step actions aren't producing the expected screenshot.

Some things to consider when creating Multi-Step screenshots:

  • Multi-Step does not support bypassing CAPTCHAs (bot verification) or logging in with 2FA/MFA, email verification, and social accounts (e.g. Google, Facebook).
  • Ask the AI to use the html_only parameter first to inspect the live HTML of the page and copy the exact selectors for the elements you want to interact with. Note: Using html_only uses 1 screenshot credit per invocation.
  • Add an explicit wait_for_selector or wait step before performing an action on an element to ensure the element is on the page before the action runs.
  • Some sites may change the CSS Selectors used based on viewport size. Try setting page_width and page_height to match the conditions you want to capture.
  • Review the Multi-Step Actions section above for the full list of supported action types and example prompts.
  • Check the Multi-Step Help Guide for more comprehensive information.

Need assistance with your Multi-Step screenshot? Contact us with the information listed here and we can help.

What AI is being used by the analyze_any_image_with_ai tool, analyze_image_with_ai and ai_prompt screenshot parameters, or the create_domain_research tool?

As of March-April 2026, all AI-powered features in PagePixels use Anthropic Claude models.

How do I disconnect / revoke access between my AI client and PagePixels?

1. Log in to PagePixels.

2. Click the avatar in the top-right. Select the Profile option.

3. Scroll to Authorized Partner Applications section. Click the Revoke Access button.

Note: You may see multiple connections listed for the same AI application. This is expected behavior when you reconnect to our MCP Server using the same AI client (our MCP Server uses OAuth Dynamic Client Registration protocol).

Can I view the source code for the PagePixels MCP Server?

Yes. We've made the code for our MCP Server open source and you can view it here on Github.

Need assistance? Please reach out to us, and we'll be happy to help.

Support

Questions? Contact us anytime by email:

support-tickets@pagepixels.com

Or send us a message through our Support page.