How to automate screenshots of ClickUp docs

Learn how to automatically take full page screenshots of a ClickUp document page using PagePixels.

Introduction

PagePixels is a screenshot automation solution that you can use to take automated scheduled screenshots of web pages, including docs in ClickUp.

PagePixels is free to start, and this tutorial provides instructions on how to take daily full page screenshots of a public ClickUp doc page.
Quick start with a screenshot template

The quickest way to start capturing your ClickUp docs is to use the screenshot template below:

Screenshot template

Take full page screenshots of a ClickUp doc

Try template

After duplicating the template to your PagePixels account, replace the URL with your ClickUp public doc link, and click the "Save" screenshot button.

Or if you prefer to set up your ClickUp doc screenshot automation from scratch, step-by-step instructions are available in the next section.

How to automate taking a screenshot of a ClickUp doc

To take scheduled snapshots of a ClickUp doc on a daily schedule:

1

Create a screenshot

Log in to your PagePixels account, and click the "+Create Screenshot" button.

2

Set your schedule

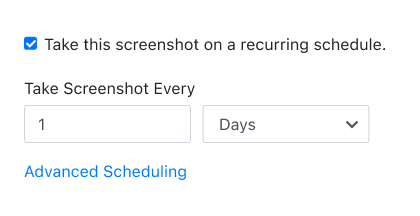
By default, recurring screenshots are set to every 5 minutes.

For a daily screenshot, change the default frequency values from every "5" "Minutes" to every "1" "Days" using the input field and drop-down menu.

3

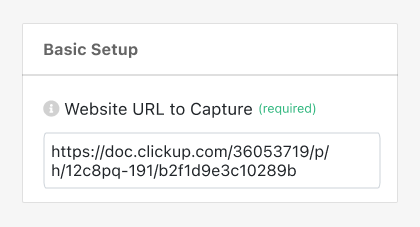
Add your URL

Copy and paste the share link for your ClickUp doc into the "Website URL to Capture" field.

4

Increase the "Time to wait" value

Because ClickUp documents can take a long time to load, we recommend increasing the "Time to wait" value from 1500 to 6000 (value is in milliseconds).

If your ClickUp document still doesn't appear fully loaded in the screenshot, you can increase this value further (max is 20000).

5

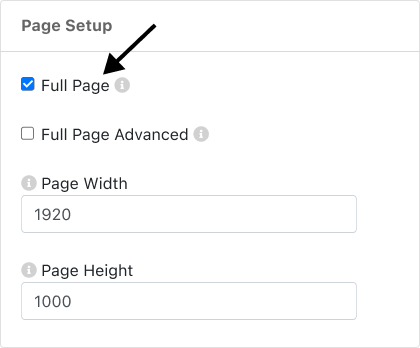
Check Full Page option

Tick the Full Page checkbox to take a full page screenshot.

6

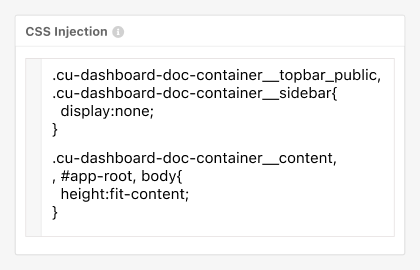
Add Custom CSS

ClickUp doc pages have CSS that can interfere with getting a full page screenshot.

You can resolve this issue by copying and pasting the following CSS into the CSS Injection field:

.cu-dashboard-doc-container__topbar_public{
display:none;
}
.cu-dashboard-doc-container__content{
height:fit-content;
}
7

Save Screenshot

Click the green "Save Screenshot" button (top-right).

Your screenshot automation is officially set, and your first screenshot will be taken shortly.

What else can PagePixels do?

When you automate screenshots of your ClickUp docs with PagePixels, you can also:

  • Schedule screenshots of your ClickUp docs by time interval, days of the week, time of day, and time zone using PagePixels' built-in scheduling system.
  • Post screenshots of your ClickUp docs to a public or private Slack channel, a Custom Webhook address, or save your screenshot images to your Dropbox account.
  • Connect PagePixels with no-code integration platforms Zapier or Make (Integromat) to take, send, and email screenshots of your ClickUp docs to thousands of services, such as Google Sheets, Gmail, and Discord.
  • Customize the style of your ClickUp doc in your screenshots with PagePixels' Custom CSS injection feature.
  • Take screenshots of only a specific element in your ClickUp doc using PagePixels' CSS Selector option.
  • Leverage PagePixels' fully-featured Screenshots API to programmatically take scheduled and instant screenshots of your ClickUp docs.
  • Have AI compare and contrast your ClickUp doc screenshot images with the Multiple Image AI Analysis endpoint (powered by OpenAI - creator of ChatGPT) of our Screenshot API.

Discover even more possibilities of what you can do on our Features page →

Support

Questions? Contact us anytime by email:

support-tickets@pagepixels.com

Or send us a message through our Support page.