Learn how to automatically capture screenshots of Pinterest web pages on a recurring schedule with PagePixels.
Introduction
PagePixels is a screenshot automation tool that you can use to take automated scheduled screenshots of web pages, including screenshots of Pinterest pages.
PagePixels is free to start,
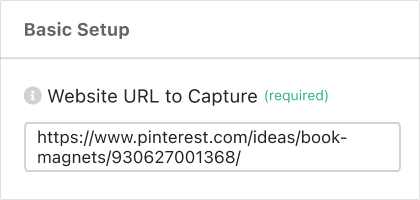
and this tutorial shows you the steps to automatically capture screenshots of a Pinterest ideas page on a daily schedule.
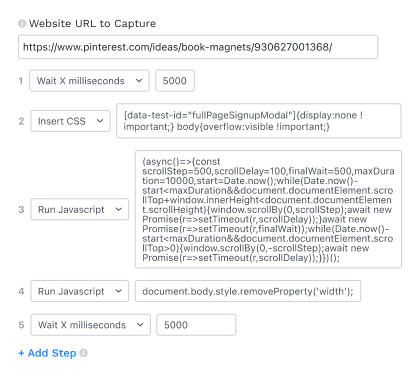
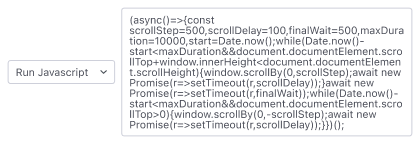
In this case, to encourage Pinterest images and other content to load, use the following javascript:
(async()=>{const scrollStep=500,scrollDelay=100,finalWait=500,maxDuration=10000,start=Date.now();while(Date.now()-startsetTimeout(r,scrollDelay));}await new Promise(r=>setTimeout(r,finalWait));while(Date.now()-start0){window.scrollBy(0,-scrollStep);await new Promise(r=>setTimeout(r,scrollDelay));}})();
Step 4: Run Javascript
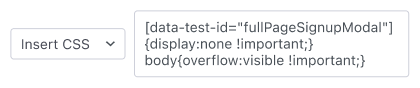
To remove the width Pinterest adds onto the body container, use another "Run Javascript" step:
document.body.style.removeProperty('width');
Step 5: Wait X milliseconds
Add one more wait step to allow more time for the javascript to run and the Pinterest content to load.
Click the green Save Screenshot button (top-right).
Your screenshot automation is officially set, and your first Pinterest page screenshot will be taken shortly.
What else can PagePixels do?
When you automate your Pinterest screenshots with PagePixels, you can also:
Schedule website screenshots
by time interval, days of the week, time of day, and time zone using PagePixels' built-in scheduling system.
Run a series of user browser actions on a web page before taking a screenshot, such as filling out a form and clicking buttons, with
Multi-Step Screenshot
functionality.
Automatically send screenshots to a
Slack
channel, a
Custom Webhook
address, or save the images in your
Dropbox
account.
Integrate your screenshots with thousands of services, such as Google Drive, Google Sheets, OneDrive, and Discord, with the PagePixels Zapier, Make, n8n, or Power Automate integrations.
Automatically have AI process your screenshot images with the
AI Analysis Screenshot
feature.
Dynamically display the most up-to-date screenshot on your website, data visualization tool, and app with a single
Embed URL.
Leverage proxies to capture website screenshots from different locations around the world with the
Real Location Screenshots
feature.
Remove elements and customize the style of your screenshot with PagePixels'
Custom CSS Injection
feature.
Convert data from third-party APIs, HTML emails, and other HTML content into screenshots using the
Custom HTML Screenshots
feature.
Use the PagePixels
Screenshots API
to add screenshot automation to your web application.
Empower your AI assistant with advanced screenshot capabilities by adding the PagePixels Screenshot MCP Server as a tool.
Ask AI to compare and contrast multiple screenshots or other images using the
Multiple Image AI Analysis
feature.
Automate structured data extraction and AI-powered text analysis for your marketing, sales, and lead generation needs with PagePixels'
Website Domain Research feature.
See what else PagePixels can do for you on our
Features page →