How to automatically take a screenshot of a specific web page element in Zapier

Learn how to capture automatic screenshots of a selected element on a web page in your Zapier automations with the PagePixels Screenshots Zapier app.

Introduction

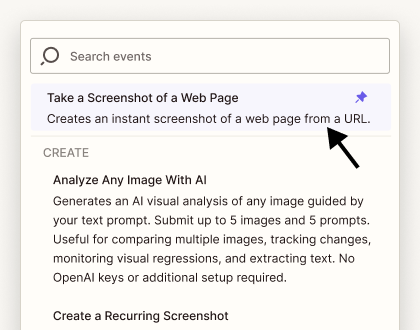
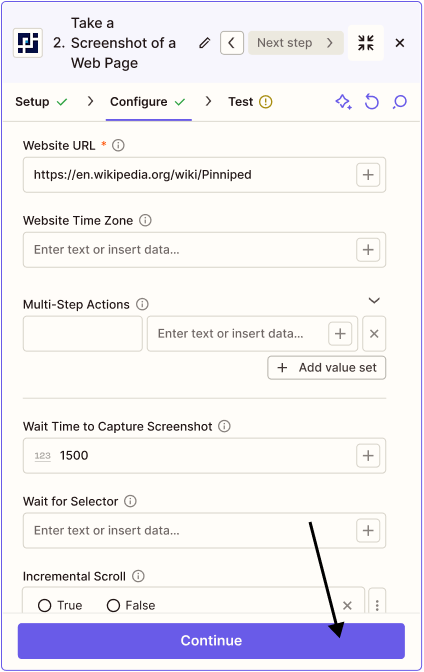
Want to automate screenshots of only a specific part of a web page in your Zapier workflows? With PagePixels' CSS Selector Screenshot feature, you can capture screenshots of just the element that interest you.

PagePixels is free to start and once you've setup your CSS Selector screenshot in Zapier, you can send the images to one of the thousands of apps Zapier supports, like Google Sheets, Gmail, and OneDrive.

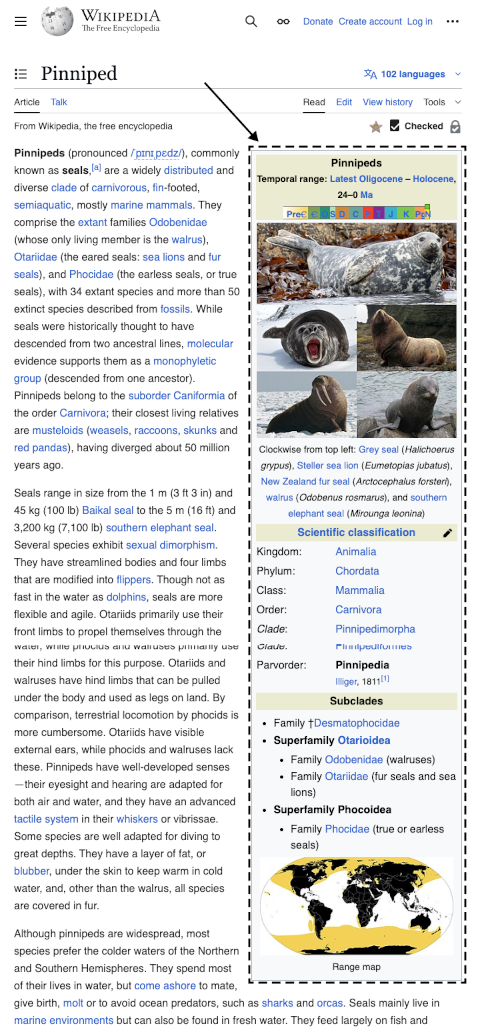
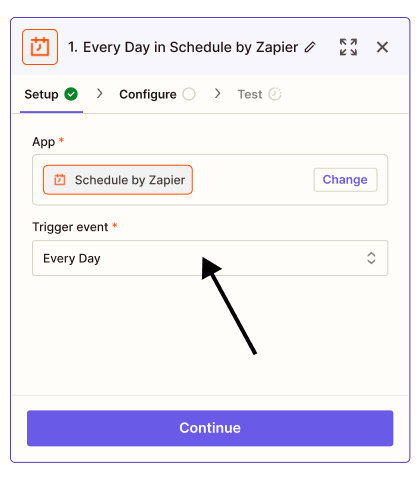
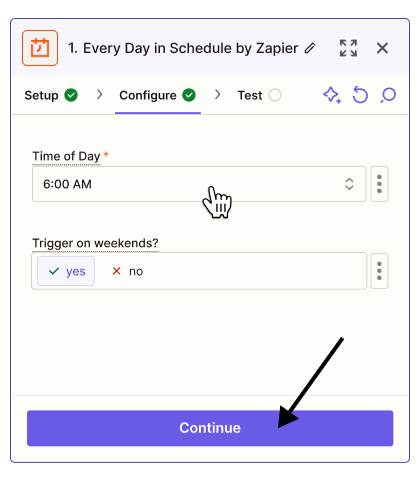
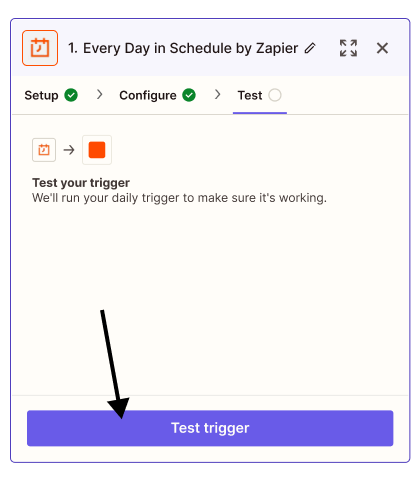
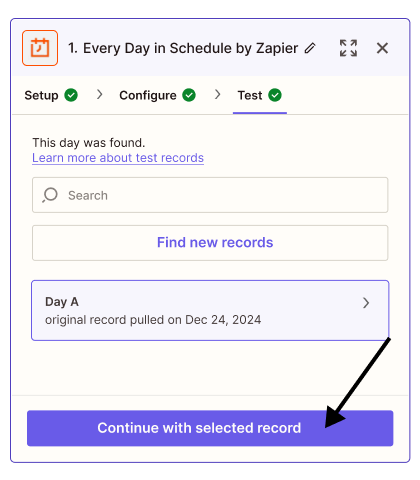
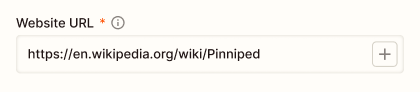
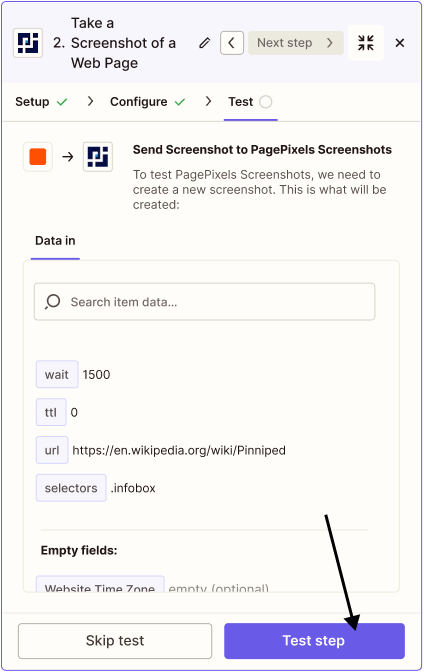
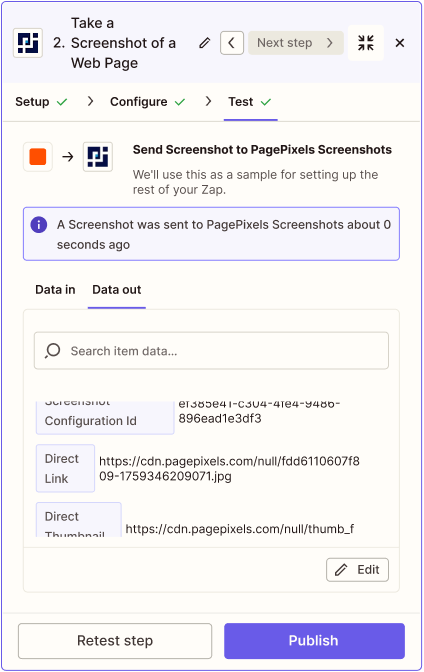
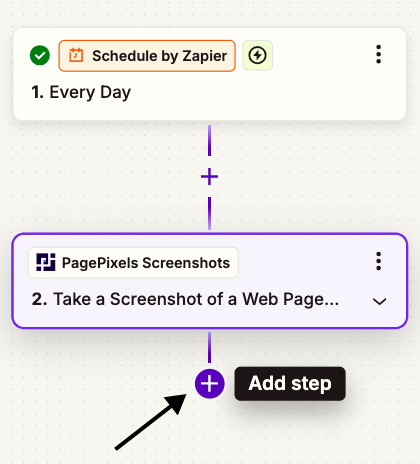
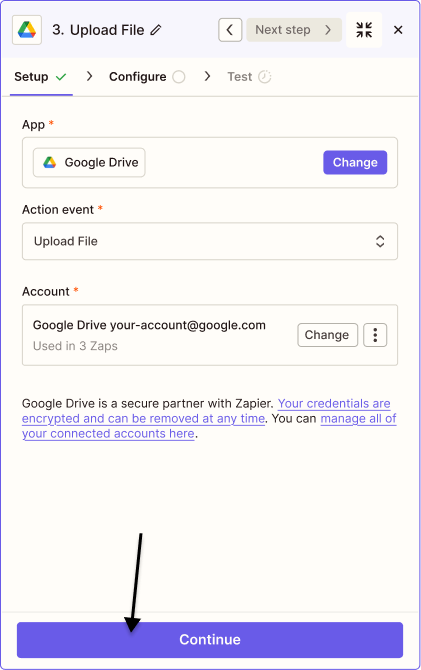
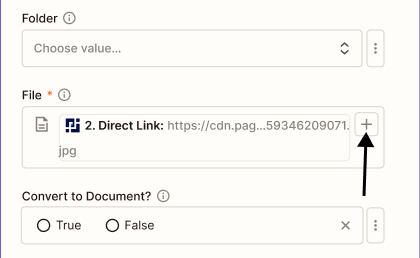
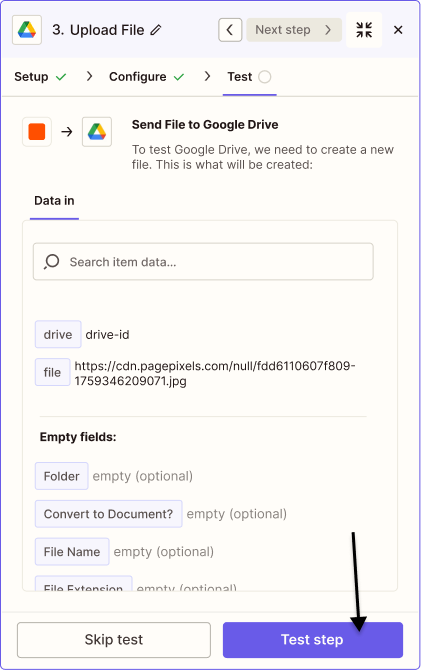
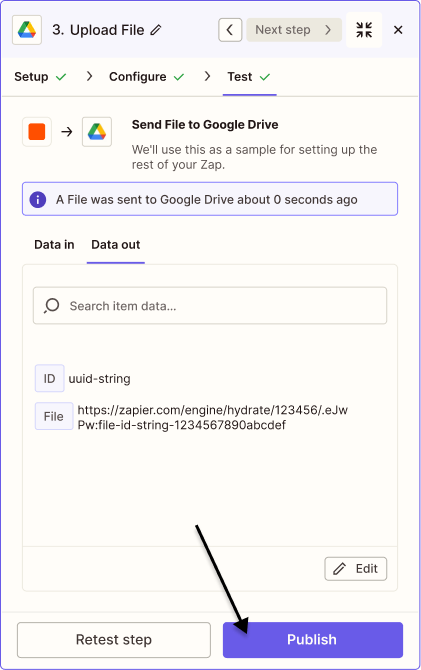
As an example, this tutorial demonstrates how to create a Zapier screenshot automation that takes a daily screenshot of an element on a Wikipedia page and uploads the screenshot image to Google Drive.

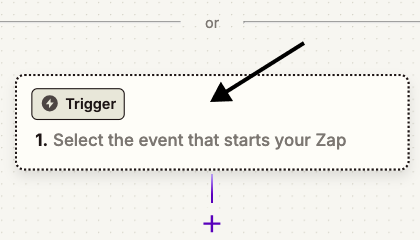
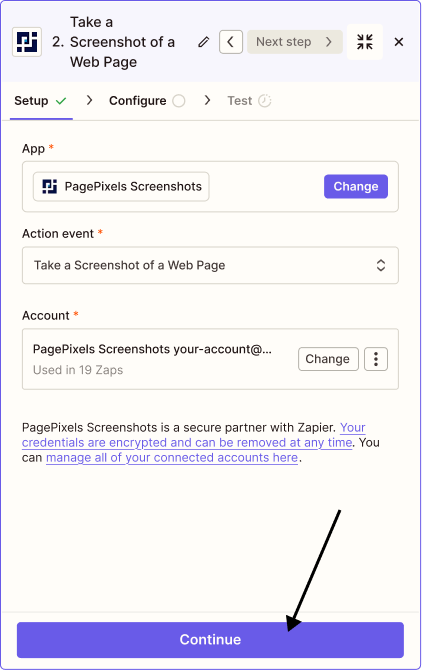
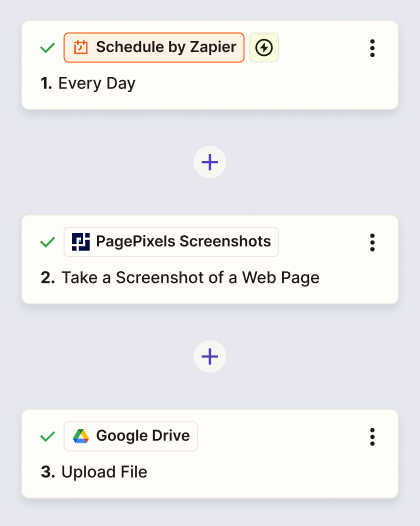
Zapier automation (Zap) we'll create in this tutorial:

Displays the Schedule by Zapier Every Day app connecting to PagePixels Screenshots Take a Screenshot of a Web Page action which then connects to Google Drive's Upload file app event

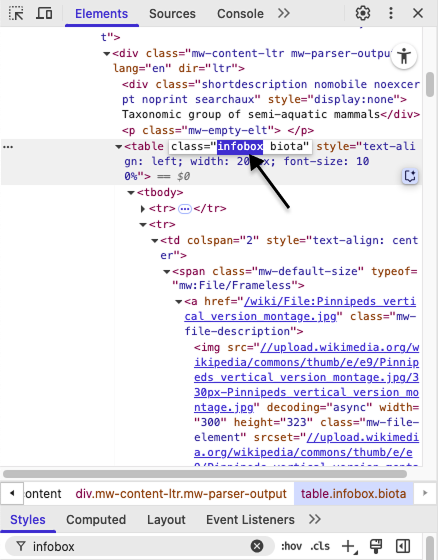
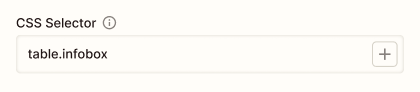
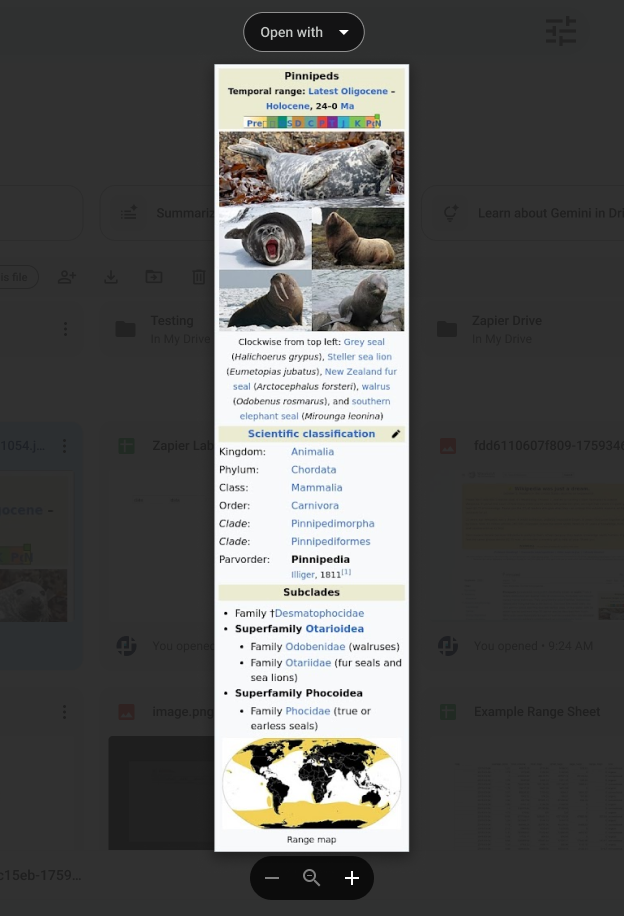
Element we're going to capture in this tutorial:

How to take daily screenshots of an element on a web page and send to Google Drive in Zapier

To capture a daily screenshot of a certain part of a website and save the image to Google Drive in Zapier:

1

Open the web page

Visit the web page in an incognito browser. For example: https://en.wikipedia.org/wiki/Pinniped

2

Open Dev Tools

Right-click on the element you want to screenshot, and select the "Inspect" option.

3

Confirm Element in Dev Tools

Hover over the element in your developer tool's Elements tab. This will highlight the element in the web page.

Confirm this is the element you want to screenshot and that the element has a height greater than 1px (e.g. the image above shows 316.38 x 1245.08 dimensions).

Note: If the element has a 0 height dimension (e.g. 256 x 0, 0 x 0), you cannot capture that specific element.

4

Get CSS Selector

For this example, we're going to use the unique class "infobox" on the table element as the selector:

table.infobox

Save this CSS selector to use in the PagePixels Zapier app.

5

Create a new Zap

Click "Create", then select "Zap" from the list of options.

6

Set up your Trigger app event

Click "Trigger" and select the app event that starts your Zap.

For example, you can use Zapier's Schedule "Every Day" app event to trigger your screenshot automation at a specified time each day.

Configure your desired schedule and click the "Continue" button.

Click "Continue" again, and test your Trigger.

Click "Continue with selected record" to finish setting up your Trigger app event.

7

Set up your PagePixels Action app event.

Search for "pagepixels" and choose the "PagePixels Screenshots" app.

Select the Take a Screenshot of a Web Page Action event.

Authorize or choose which PagePixels account you want to use, and click Continue.

Add a webpage link to the Website URL field.

Add the selector you retrieved from the web page into the CSS Selector field.

Finish configuring your screenshot. Click Continue.

Click Test step.

Preview the test response.

8

Send the screenshot to another Zapier app.

Click the plus "Add Step" button, and select your desired app.

For this example, search for and select the Google Drive app.

Choose the "Upload file" action event. Authorize or select your Google Drive account, and click the Continue button.

Click the plus button and select Direct Link to add your screenshot to the "File" field.

Finish configuring your Google Drive upload, and click Continue.

Click Test Step to test uploading your screenshot file to Google Drive.

Click Publish to activate your Zap automation.

EXAMPLE RESULT

Your Zapier screenshot automation is active and will automatically take daily CSS Selector screenshots and upload the images to Google Drive.

See our Zapier Help Guide for more comprehensive information about our Zapier integration.

Frequently Asked Questions

Where can I find more information about CSS Selector Screenshots, including other examples?

Check out our CSS Selector Help Guide for helpful details and examples of how you can use the PagePixels' CSS Selector feature.

I'm getting a Node has 0 height error. How do I resolve this?

This error occurs if the element you've selected has no height. To resolve, you'll need to select a different element on the page that has a minimum 1px height.

Where can I find more information about the PagePixels Screenshots Zapier app, including examples?

Check out our Zapier Help Guide for helpful details and examples of how you can use the PagePixels Screenshots Zapier integration.

Can I get help finding the CSS Selector I need for my screenshot?

We understand that CSS Selectors can be tricky at first, and we're happy to offer free personalized setup guidance for your first CSS Selector Screenshot.

To help us assist you more effectively, please share the following information:

  • The web page URL where the content you want to capture is located.
  • An image example of how you'd like the final screenshot to look.
  • Let us know where you're using PagePixels: our web app, API, Zapier, Make, or something else.

Please send the information from the email associated with your PagePixels account to:

support-tickets@pagepixels.com

There's no single element that contains only the information I want to screenshot. Is there a way I can remove the stuff I don't want in the screenshot?

You can remove elements you don't want appearing in the screenshot using CSS in the CSS Injection field in the PagePixels Screenshots Zapier app.

For example: #element-to-remove{display:none !important;}

Want to learn more about CSS? Mozilla has great documentation.

Need help getting your screenshot to look just right? Contact us and we can help.

What else can PagePixels do?

When you automate screenshots with PagePixels and Zapier, you can also:

  • Automate clicking buttons, filling out forms, performing a search, and more - all before taking a screenshot with Multi-Step functionality in Zapier.
  • Create screenshots from data in Zapier apps, including emails, using the Take a Screenshot of Custom HTML Action.
  • Take and have AI analyze your screenshots with PagePixels' Take a Screenshot of a Web Page and Analyze the Image With AI Action in Zapier.
  • Compare, contrast, and extract insights from multiple screenshots and other images with the PagePixels' Analyze Any Image with AI Action in Zapier.
  • Capture screenshots from different locations around the world with PagePixels' "Take a Real Geolocation Screenshot" Action in Zapier.
  • Use an Embed URL to dynamically share and display the latest screenshot on your website, dashboard, presentation app, and more.
  • Remove elements and customize the style of your resulting screenshots with PagePixels' Custom CSS injection feature.
  • Take screenshots of entire webpages with the Full Page or option.
  • Block ads and stop cookie banners from appearing in your screenshots with PagePixels' "No Ads" and "No Cookie Banners" options.
  • Automate structured data extraction and AI-powered text analysis across multiple domains with Domain Research Actions in Zapier.

Explore even more possibilities of what you can do on our Features page →

Support

Questions? Contact us anytime by email:

support-tickets@pagepixels.com

Or send us a message through our Support page.